Depending where you live, you are likely to need a windshield sooner or later. In the case of several Mercedes-Benz models, that can be a challenge or impossible.
As of now, there is no OEM W123 windshield glass available from Mercedes. I spoke with the Mercedes-Benz Classic Center in California to acquire a new windshield, and was told it is out of stock and they don't know when it will be made available. They are hoping very soon as they are getting quite a few calls for it. In the meantime, you can get a new windshield from Pilkington Classic for about $220. While I very much respect Pilkington for their glass, it does not supplement the original glass from Mercedes.
When I purchased my 240D in 2015, I needed to get a new windshield and installed Pilkington glass as I was still not certain that I would keep the car long term. Now that I know I am keeping the car, and my three year old windshield is now damaged again from a landscape truck dropping gravel on the highway, I am wishing I could install OEM glass.
With regard to the R107 OEM windshield glass, it is still available at about $500 a copy, but the side door glass is no longer in production and very few new pieces are left.
As it stands, my R107 is at the Mercedes dealer this week being fitted with a genuine Mercedes windshield. Now we can only hope this will last for many years to come, and not succumb to a haphazardly covered load of debris taking flight on the highway.
If you are wanting OEM glass, please contact Mercedes-Benz USA or Europe and express your desire to have the original parts reproduced once again.
Friday, October 12, 2018
Wednesday, October 3, 2018
Mercedes R107 — Points vs. Electronic Ignition
While I am perhaps overly indebted to authenticity, there comes a point when modification is just worth it. Prime example, points ignition vs. electronic ignition.
Admittedly, I was very skeptical when I first installed electronic ignition in my 1965 Rolls-Royce Phantom V eight years ago. It has however been the best and only modification I have made to that car. I have now made this modification to the 1975 Mercedes 450SL and again, what a difference.
The system I chose for the Mercedes 450SL was the Pertronix Ignitor electronic ignition (part 1885) in combination with the Pertronix Flame Thrower 1.5 ohm, 40,000 volt coil. The Flame Thrower coil is a must if you are going to make the modification. No, the coil does not look like the original OEM however, there are options to help that. More on that in an upcoming post. (For what it's worth, the Rolls-Royce received the Pertroinx Ignitor II system, which does not fit the 450SL.
For the 1975 450SL, modifications will be needed on Pertronix Ignitor for it to fit properly in the distributor. The last I heard from Pertronix, was no plug and play version was going to be produced for this car as there was not enough demand as of yet.
The tachometer will also need to be reconfigured following the installation which is not complicated but once again it is not a simple plug and play as with many other cars that receive the system. More on how this is done in a future article.
Finally, you can decide either to leave the original Mercedes switch gear or eliminate it. I chose to eliminate it and remove the two resistors as recommended by Pertronix. If the resistors are kept inline, the Flame Thrower coil will not perform as designed, hindering the upgraded performance. Do however keep all your original components. Many collectors would like to have those quickly vanishing parts should you sell the car.
To keep the look of the car original, I have left the switch gear and the two Bosch resistors in place.
Pros of the Pertronix ignition? A much improved idle and engine responsiveness, in addition to a slightly increased fuel economy. One particular note of interest was noticing that both the Rolls-Royce and the Mercedes delivered a different exhaust smell following the installation of the electronic ignition. It was quite evident to the olfactory that the combustion was more complete.
Cons A little extra wiring will need to be done and a bit of modification to the Ignitor unit itself to seat properly in the distributor.
Wednesday, August 8, 2018
Early 450SL/SLC Seat Adjustment Knob Removal
Should it be necessary to remove the seat back adjusting knob from an early Mercedes R107 350SL, 450SL/SLC will require a bit more than just a pull or pry. If you are not sure what style adjusting knob is on your car check first, as you will destroy an early version by trying to pry it off.
The following is helpful should you need to replace the plastic chrome trim on the seat hinges or disassemble the seats for restoration.
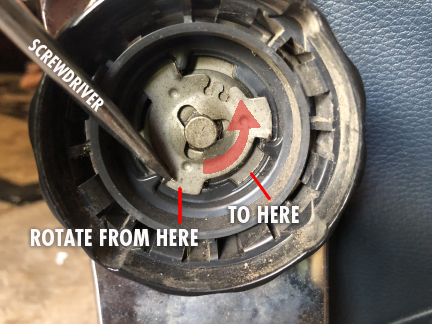
STEP 2
Using a hammer and screwdriver, gently tap the locking spring clip counter clockwise to the "unlock" position.

STEP 3
Pull off rear portion of knob.

STEP 4
The trim piece can now be removed. This would be the time to give the adjusting hinge mechanism a good cleaning.

Reassembly is the reverse.
The following is helpful should you need to replace the plastic chrome trim on the seat hinges or disassemble the seats for restoration.
STEP 1
Insert a small screwdriver into the 4 slots around the knob center insert as shown. Do this gently to avoid cracking the cover.


STEP 2
Using a hammer and screwdriver, gently tap the locking spring clip counter clockwise to the "unlock" position.
STEP 3
Pull off rear portion of knob.

STEP 4
The trim piece can now be removed. This would be the time to give the adjusting hinge mechanism a good cleaning.

Reassembly is the reverse.
Friday, July 20, 2018
W123 Mercedes VDO Tempomat Cruise Control Actuator Replacement
The Mercedes-Benz VDO W123 Tempomat cruise control is now going on 42 years of service for the first years of production. Or perhaps it is no longer in service due to mechanical failure.
These units, based on the research I have done, are pretty robust and are serving a good long time. That said, my 1981 240D with the bellows style VDO Tempomat actuator has been baking under the hood in the desert for many years and is finally not holding proper vacuum.
NOTE: Before you get a new actuator, they are $640, make sure it is not the amplifier (the brains) under the driver side dash or a vacuum leak elsewhere. The amplifier is subject to intense heat and vibration and they do get fickle with age. Several symptoms of a amplifier going bad is being able to increase your speed using the cruise control lever but not being able to set that speed once you let go. Other scenarios include the cruise control cutting out while engaged.
I have already replaced my control unit with a remanufactured unit several months back as new units are not available from Mercedes.
Once the cruise control began working, I realized it had probably not been used in many years and the actuator began to malfunction after several trips on the highway. The symptoms: Once the speed was set, it would steadily lose it a few miles per hour every several seconds. Either the Tempomat was losing vacuum due to a dry rotting bellows or the internal vacuum/vent switch was not engaging properly. Either way, in my case, it was time for a new unit as I knew I did not have any vacuum leaks.
NOTE: It is also important to note that the cruise control actuator is to be hooked up to the 2/3 way yellow and gray vacuum check valve (some check valve used for the door locks) which draws vacuum from the vacuum reservoir tank located in the trunk above the gas tank. Make sure this is not leaking or it will cause problems with your cruise control among other problems.
REPLACING THE VDO TEMPOMAT CRUISE CONTROL ACTUATOR
The replacement of the actuator is not complicated at all, but one that will require a great deal of finesse to remove the bowden cable, if you wish to save the cable. While there are a number of NOS actuators available from Mercedes, there are evidently only two bowden cables remaining in the global Mercedes stock.
While the cable is not fragile, all the plastic clips that are necessary to keep the cable in place are! If you break any of these clips the cable will not function.
STEP 1
Disconnect the vacuum, and vent lines along with the electrical plug. Now is the time to make sure no vacuum hoses or rubber connectors are failing.
STEP 2
Remove the nut holding the actuator in the bracket.

STEP 3
Carefully release the bowden cable from the throttle linkage (valve cover area). Remember, the plastic clips are very brittle and are ready to crumble. Gently using needle nose pliers will work well.
STEP 4
Unscrew the plastic threaded adjusting "nut" and once again using the needle nose pliers release the next section of the bowden cable.

STEP 5
Push the cable toward the actuator to give a bit of slack to remove the next clip. This clip is awkward to remove and is too ready to fall apart. Go slow and gentle.
STEP 6
Unscrew the three screws at the actuator retaining plate for the bowden cable. Give yourself enough slack for room to work.

STEP 7
Release bowden cable from cover

STEP 8
With the cable removed, the installation process is the reverse.
STEP 9
The following steps are for the W123 second generation diesel models only! To adjust earlier models, W115 and W123, please refer to the Mercedes Service Manual.
Adjust the cable. If the cable is not properly adjusted according to the Mercedes service manual the cruise control will not function properly. Make the following check and adjust cable length as necessary with the plastic threaded adjusting "nut": Press and hold the emergency stop lever (diesel) in the off position and check the slack of the cable.
These units, based on the research I have done, are pretty robust and are serving a good long time. That said, my 1981 240D with the bellows style VDO Tempomat actuator has been baking under the hood in the desert for many years and is finally not holding proper vacuum.
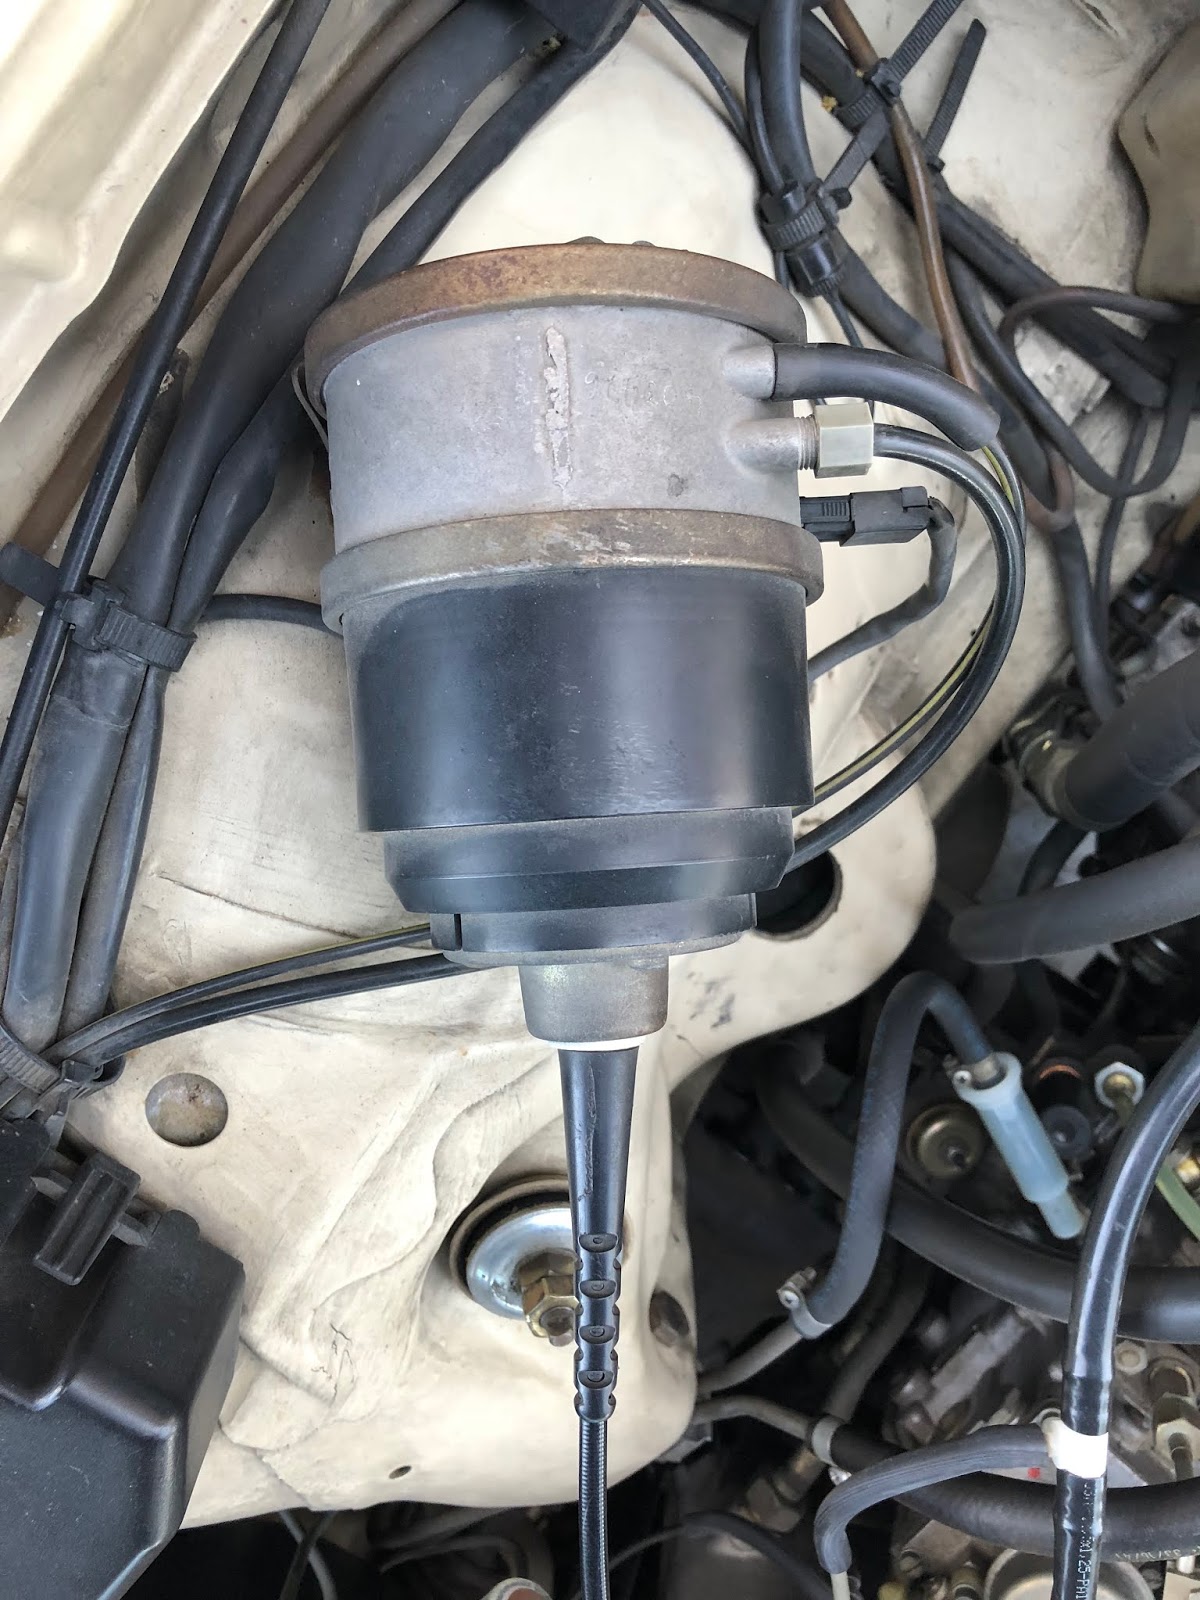 |
| Mercedes W123 VDO Tempomat cruise |
NOTE: Before you get a new actuator, they are $640, make sure it is not the amplifier (the brains) under the driver side dash or a vacuum leak elsewhere. The amplifier is subject to intense heat and vibration and they do get fickle with age. Several symptoms of a amplifier going bad is being able to increase your speed using the cruise control lever but not being able to set that speed once you let go. Other scenarios include the cruise control cutting out while engaged.
I have already replaced my control unit with a remanufactured unit several months back as new units are not available from Mercedes.
Once the cruise control began working, I realized it had probably not been used in many years and the actuator began to malfunction after several trips on the highway. The symptoms: Once the speed was set, it would steadily lose it a few miles per hour every several seconds. Either the Tempomat was losing vacuum due to a dry rotting bellows or the internal vacuum/vent switch was not engaging properly. Either way, in my case, it was time for a new unit as I knew I did not have any vacuum leaks.
NOTE: It is also important to note that the cruise control actuator is to be hooked up to the 2/3 way yellow and gray vacuum check valve (some check valve used for the door locks) which draws vacuum from the vacuum reservoir tank located in the trunk above the gas tank. Make sure this is not leaking or it will cause problems with your cruise control among other problems.
REPLACING THE VDO TEMPOMAT CRUISE CONTROL ACTUATOR
The replacement of the actuator is not complicated at all, but one that will require a great deal of finesse to remove the bowden cable, if you wish to save the cable. While there are a number of NOS actuators available from Mercedes, there are evidently only two bowden cables remaining in the global Mercedes stock.
While the cable is not fragile, all the plastic clips that are necessary to keep the cable in place are! If you break any of these clips the cable will not function.
STEP 1
Disconnect the vacuum, and vent lines along with the electrical plug. Now is the time to make sure no vacuum hoses or rubber connectors are failing.
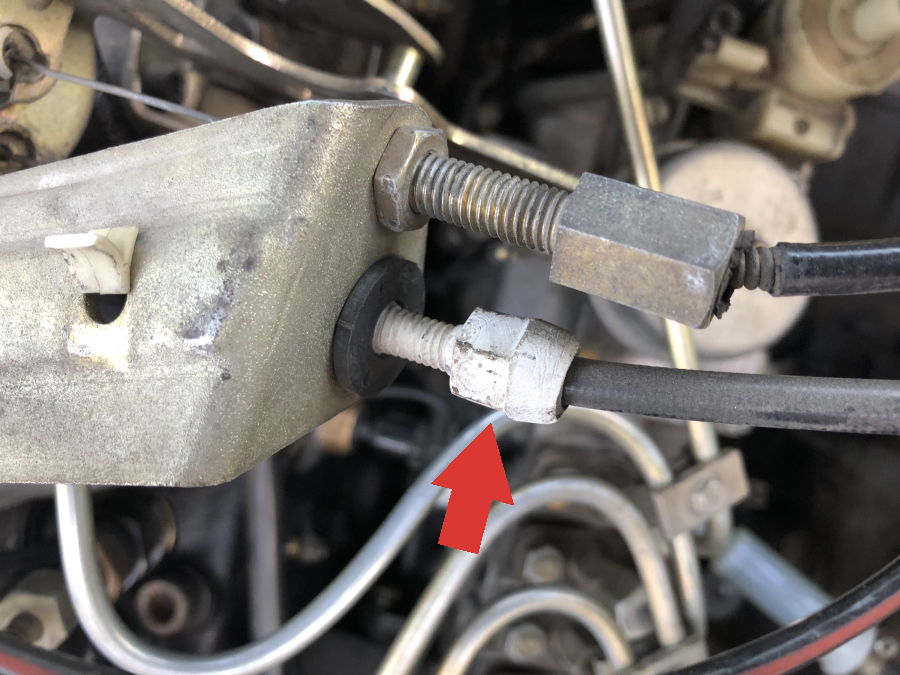
 |
| Disconnect the three plugs show in the photo. The gray nut for the vent line is plastic! |
STEP 2
Remove the nut holding the actuator in the bracket.

STEP 3
Carefully release the bowden cable from the throttle linkage (valve cover area). Remember, the plastic clips are very brittle and are ready to crumble. Gently using needle nose pliers will work well.
STEP 4
Unscrew the plastic threaded adjusting "nut" and once again using the needle nose pliers release the next section of the bowden cable.
STEP 5
Push the cable toward the actuator to give a bit of slack to remove the next clip. This clip is awkward to remove and is too ready to fall apart. Go slow and gentle.
STEP 6
Unscrew the three screws at the actuator retaining plate for the bowden cable. Give yourself enough slack for room to work.

STEP 7
Release bowden cable from cover

STEP 8
With the cable removed, the installation process is the reverse.
STEP 9
The following steps are for the W123 second generation diesel models only! To adjust earlier models, W115 and W123, please refer to the Mercedes Service Manual.
Adjust the cable. If the cable is not properly adjusted according to the Mercedes service manual the cruise control will not function properly. Make the following check and adjust cable length as necessary with the plastic threaded adjusting "nut": Press and hold the emergency stop lever (diesel) in the off position and check the slack of the cable.
Tuesday, July 3, 2018
Mercedes R107 450SL Bumpers – U.S. Market Cars
In the early 1970's the U.S. Department of Transportation required upgraded bumpers to accept a 5 mph "tap" without any significant damage. As many will remember, these bumpers were pretty ugly and extended the length of the car significantly.
Mounted on twin shocks, with rubber corners, rubber block overriders and rubber impact strips, they have now taken on a certain retro charm.
Disassembling the bumper for restoration or repair is not complicated and is well worth it if you are wanting to do your car right.
STEP 1
Both the front and rear bumper are held in place by two shocks mounted to the body of the car and by two mounting brackets on each side of the driver and passenger fenders (front and back). Start by detaching the side brackets. Next, simply remove the shock bolts and remove the bumper. NOTE: The bumpers are fairly heavy and awkward. I would recommend making this a two person job to avoid damaging the car or the bumper.
STEP 2
Once the bumper(s) have been removed it is time for disassembly. My stainless steel caps were fairly dinged up, but purchasing new ones will cost you a considerable amount. With that knowledge at hand, I decided to have the old caps restored. You can either take the caps to a metal polishing shop who will beat out the dents and polish or, should you have the skill and tools to remove the dents it will save you a good bit of money. I chose the latter as I have metal working experience and once dent free, took the caps to be polished. I would recommend not attempting to polish at home unless you have professional equipment. Getting the mirror finish can not be achieved with consumer grade tools.
STEP 3
Next, remove the turn signal units to avoid any damage to them. Should you need one or two they are still available, as are just the lenses. The OEM unit is ULO and can be obtained from AutohausAZ

STEP 4
Now remove the shocks from the bumper. Remove the 4 bolts and extract shock along with two brackets and 2 rubber buffers.

STEP 5
With the shocks removed, the retaining nut for the overriders will be exposed—remove.

STEP 6
Remove the rubber bumper end caps by removing the 3 nuts and bolts.

STEP 7
Now remove the rubber impact strip inserts. The front bumper will slide out, while the rear bumper will require the removal of one overrider/shock bracket to remove the impact strip.
STEP 8
At this stage the stainless steel bumper caps are now ready to be removed. Work carefully when removing to avoid bending the metal. Slightly lift up each tab to loosen the cap. Gently pry off cap from the back side (not the front lip). The tabs do not need to be opened up very much to get the cap off.
Be mindful that you will be working around a rubber gasket and soft rubber sponge strip used to eliminate water and vibration.
With the bumper now disassembled and while the caps are off getting worked on, now is the time to clean and prep the bumpers.
As you will see, the lower portion of the bumper is factory painted with a "rocker panel" stone guard. SEM makes a very good product for this application - Part No. 39793. Make sure to scrape, sand and clean very well before reapplying a new coating. Spray in even long strokes and do not apply in heavy coats.
At this stage and once the bumper is dry for a good 24 hours at 75°F, the bumper can be reassembled and installed. Again, I would recommend this as a two person job.
Sunday, June 17, 2018
W123 Valve Train Noise After Oil Change
If you own a W123 Mercedes diesel and have heard what appears to be valve train clatter, ticking, clicking, tapping, your choice of words, it may very well be the timing chain tensioner.
Since 2015 my 1981 Mercedes 240D has clattered on start up following an oil change. This apparent valve train noise however subsided the moment the system pressurized, roughly 5-7 seconds. According to Mercedes the 5-7 seconds it took to pressurize was perfectly normal but the clattering was not. Ironically no one pointed to the tensioner as a possible problem.
Understand, the W123 diesels, whether 240 or 300 series engines, do not have hydraulic lifters so there should be nothing to "tick, clatter or tap". The one thing that is hydraulic is the timing chain tensioner.
Changing the timing chain tensioner is not hard and will also potentially restore your timing by a touch, reduce a considerable amount of noise from the engine bay and the biggest thing of all, save other components from being destroyed!
STEP 1
Drain radiator. If you have not changed the coolant in the past 2-3 years, now is the time to service the cooling system. Do a complete flush with new Mercedes coolant. FYI, why do I recommend Mercedes coolant, simple they have proprietary additives that keep the system in good shape for the duration of the 2-3 years it is in the system. Other coolants I have tired have not maintained their clarity on changing as the Mercedes brand has.
STEP 2
Remove the thermostat housing assembly from the head. You will only need to disconnect the short coolant hose shown below. Check this hose for any dry rot and replace if necessary. NOTE: A considerable amount of coolant will flow out when disconnecting.
In addition, I would highly recommend to replace the two bolts holding the thermostat assembly to the head. They pass through the water jacket and will most likely be rotting. Mercedes has them for about $6 ea. Worth the price to not have a broken bolt the next time you have to get into the system.
This is also good time to replace the thermostat if you need a new one.

STEP 3
Remove the 2 bolts and one exhaust manifold nut. NOTE: more than likely this tensioner will be stuck in place and will need to be pried off the side of the head, but if it still has any "spring" left it will pop out.

STEP 4
At this stage you can disassemble and see if you can rebuild the unit. Mercedes has the spring but no longer make several other key components in the system that will more than likely need replacing. I went by way of a new tensioner as I need two parts that were no longer available.
Mercedes-Benz still has the tensioner available for about $330. Febi a German OEM supplier also has them for about $75. I am a big fan of all OEM but in this case I could not see a difference in construction and went with the Febi. Time will tell.
STEP 5
Clean the area around the tensioner hole making sure not to introduce any dirt into the engine.
STEP 6
Place gasket on end of new tensioner and mount. The new tensioner will have much more resistance and will require you to compress it while installing the bolts.
STEP 7
Reinstall cooling system components, and refill system with coolant. Do not use the old coolant.
STEP 8
Run car and listen for any unusual sounds. Check coolant level after engine has cooled.
Monday, May 7, 2018
Removing Mercedes R107 450SL Dashboard Vents
After 43 years, the heat and A/C vents are filthy and not moving freely as they did from the factory. While the dashboard is out and being prepped for refinishing I decided to remove the five ball vents for a good cleaning. Here is how to do this with ease.
The vents are held to the dashboard by a large "wave" washer and two built in clips.

To remove the vent nozzle depress one of the plastic tabs and gently lift up on that side to keep it from snapping back in place. Repeat the process with the other tab and gently separate the two halves. For the three center vents, a wide flat screwdriver worked great. The end vents however, did not have the room needed for the screwdriver and so I used a paint can opener which worked excellently.

Next, take a very small screwdriver and gently pry wave washer over tabs and carefully press remaining assembly through the front of the dashboard.
Once the vent assembly has been removed, it can be cleaned. I use Dawn liquid dish detergent and a soft toothbrush and warm water. The results could not be better. NOTE: Remember the plastics are old and brittle. Be very careful and don't force anything—unless money is no object.
DO NOT grease or lubricate any part in the vent assembly. It was not done from the factory and should not be done now as any lubricant will attract a considerable amount of dirt in the vent. If the vents don't feel buttery smooth, know they weren't when the car was new either.
The process of installation is the reverse.
The vents are held to the dashboard by a large "wave" washer and two built in clips.

To remove the vent nozzle depress one of the plastic tabs and gently lift up on that side to keep it from snapping back in place. Repeat the process with the other tab and gently separate the two halves. For the three center vents, a wide flat screwdriver worked great. The end vents however, did not have the room needed for the screwdriver and so I used a paint can opener which worked excellently.

Next, take a very small screwdriver and gently pry wave washer over tabs and carefully press remaining assembly through the front of the dashboard.
Once the vent assembly has been removed, it can be cleaned. I use Dawn liquid dish detergent and a soft toothbrush and warm water. The results could not be better. NOTE: Remember the plastics are old and brittle. Be very careful and don't force anything—unless money is no object.
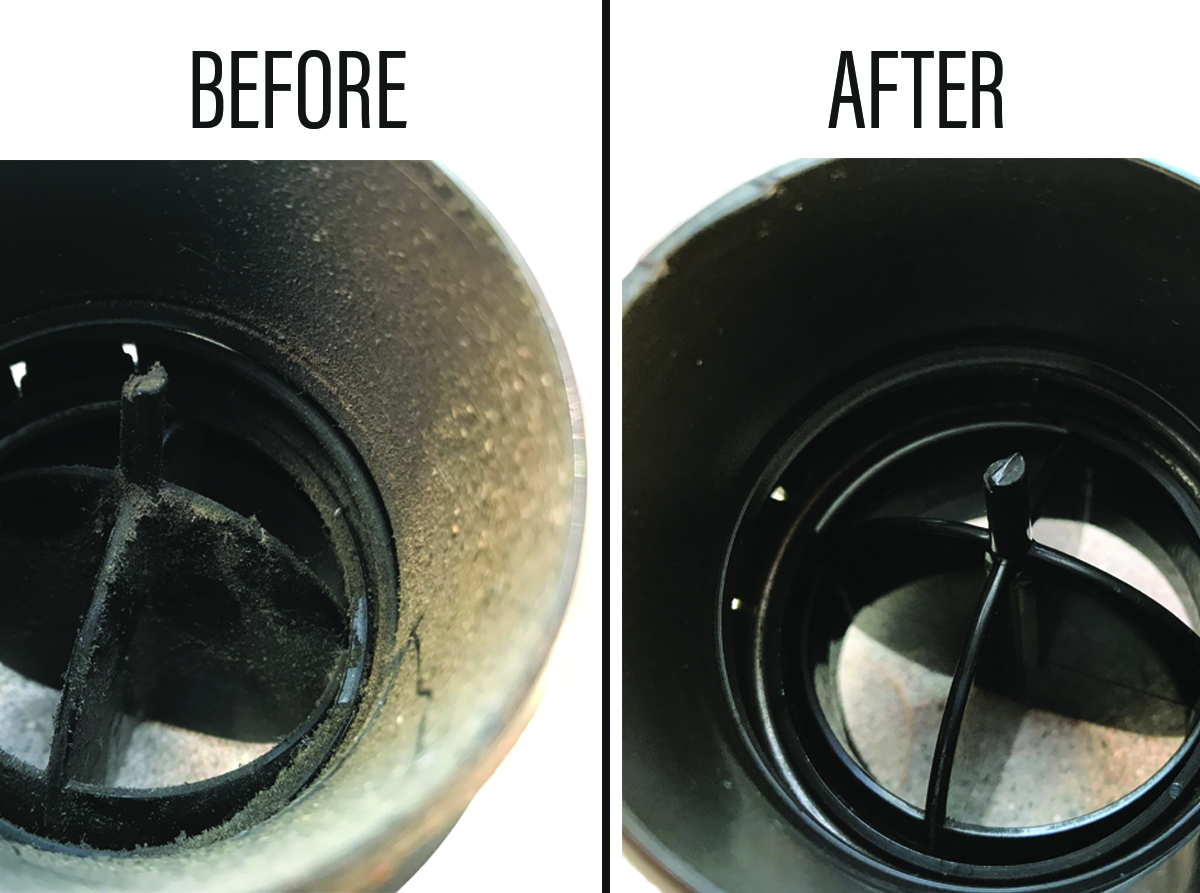 |
| The vent assembly looked and worked like new after cleaning and reassembly. It's worth the time and effort. |
DO NOT grease or lubricate any part in the vent assembly. It was not done from the factory and should not be done now as any lubricant will attract a considerable amount of dirt in the vent. If the vents don't feel buttery smooth, know they weren't when the car was new either.
The process of installation is the reverse.
Thursday, April 26, 2018
Mercedes R107 450SL High Quality Aftermarket Tail Light Lenses & Seals
Depending on where your Mercedes has spent most of its life, the tail light lenses might very well be cracking or simply dull and or discolored. The rubber weather seal is a whole other story.
Since November 2017, I have been on the SL Shop waiting list for the first round of aftermarket Mercedes R107 tail light lenses and it was worth the wait. Admittedly, I was a bit skeptical, but seeing is believing and this is an excellent reproduction. The lenses appear to be a very good quality and the fit is just as the originals. As with any product, time will tell if they are as excellent as the originals. The colors are very deep and rich which is often a shortcoming on aftermarket lenses.
With the lenses I also purchased the weather seals from the SL Shop. These seals have a perfect fit and first rate quality in addition to feeling every bit as good as the Mercedes weather seals for a fraction of the cost. Again, another several decades will be the true test, but for now it couldn't get any better.
The SL Shop, located in the UK, has provided me with numerous parts thus far for the R017 restoration. I am not only very pleased with all of the parts, but am just as delighted with their dedication to customer service. While I source many of my parts directly from Mercedes, I will continue to purchase from the SL Shop on excessively priced parts or aftermarket parts no longer available from Mercedes.
The following images show the original 43 year old Mercedes taillight along with the new after market version. NOTE: When reinstalling, DO NOT over tighten as the lens assembly can crack. The bolts are to be snug, not tight. In addition, do not force any of the parts together. They fit very snugly and should be eased back in place.
 |
| The M-B original has faded over the years from being parked in the desert for 8+ years, but remains in remarkable condition. |
 |
| Every detail is expertly replicated |
 |
| Assembly as it came out of car before cleaning for reinstallation. |
Tuesday, April 24, 2018
W123 Transmission Vacuum Diagram & Shift Issues
If your W123 diesel has shift issues, there is a very good chance that the transmission is just fine.
There are several things to check, and most of them are vacuum related. Any part of the vacuum system that is failing can and will cause disruption to the transmissions ability to shift properly
SYMPTOMS:
Transmission quickly progresses through gears (1-4) from a stop and does so a bit sloppily. Or perhaps there is flaring between particular shifts. Or perhaps, the transmission is not wanting to shift at all or shifts very late.
These symptoms should be checked at once to avoid potential damage to the transmission. The following check list will help determine what might be going wrong.
CHECK LIST:
Transmission Fluid: Drive car for at least 15 min. to make sure engine and transmission are at full operating temperature. Check fluid level with gear selector in "N". Do not use "P" as you will not get an accurate reading. NEVER OVER FILL the transmission.
Vacuum System: Must be in perfect working order. Even the smallest leak can cause havoc on how the transmission shifts. If need be, isolate the leaking sections by disconnecting them and capping off at the location. Remember, if the vacuum is to high the transmission will want to shift to quickly, if the vacuum is to low, the transmission will not want to shift at all. The transmission vacuum system for the Mercedes 240D is as follows:
The VCV and Transmission vacuum modulator are no longer available from Mercedes-Benz.
Main Vacuum Circuit Components
Change over valve (located on top of valve cover) This part breaks regularly!
Vacuum control valve (VCV)
Vacuum modulator (located at side of transmission)
Vacuum Dashpot (check valve) green in color
ADJUSTMENTS:
If your transmission fluid is at a proper level the next step is to ensure your vacuum system is in perfect working order along with the throttle linkage being properly adjusted
Once you are sure the fluid, vacuum and linkage are in good working order, the next step is to adjust the VCV valve.
HOW TO ADJUST THE VAVLE:
1. Loosen the VCV valve retaining bolts (no need to remove)
2. Remove side cover

3. Using a wrench, turn the nut on the end of the spring counter clockwise if your transmission is shifting early and clockwise if shifting late. NOTE: To make this adjustment you MUST hold the throttle linkage in the closed position while turning the nut. It is also important NOT turn the the adjusting nut more than a few millimeters at a time. If you over adjust, your transmission will not shift out of first gear.
Leave the cover off while test-driving the car to make it easier to make adjustments while you are on the road.
If this adjustment still leaves your transmission shifting a bit late or early the next step is to adjust the transmission vacuum modulator which we will cover in a subsequent article.
There are several things to check, and most of them are vacuum related. Any part of the vacuum system that is failing can and will cause disruption to the transmissions ability to shift properly
SYMPTOMS:
Transmission quickly progresses through gears (1-4) from a stop and does so a bit sloppily. Or perhaps there is flaring between particular shifts. Or perhaps, the transmission is not wanting to shift at all or shifts very late.
These symptoms should be checked at once to avoid potential damage to the transmission. The following check list will help determine what might be going wrong.
CHECK LIST:
Transmission Fluid: Drive car for at least 15 min. to make sure engine and transmission are at full operating temperature. Check fluid level with gear selector in "N". Do not use "P" as you will not get an accurate reading. NEVER OVER FILL the transmission.
Vacuum System: Must be in perfect working order. Even the smallest leak can cause havoc on how the transmission shifts. If need be, isolate the leaking sections by disconnecting them and capping off at the location. Remember, if the vacuum is to high the transmission will want to shift to quickly, if the vacuum is to low, the transmission will not want to shift at all. The transmission vacuum system for the Mercedes 240D is as follows:
 |
Main Vacuum Circuit Components
Change over valve (located on top of valve cover) This part breaks regularly!
Vacuum control valve (VCV)
Vacuum modulator (located at side of transmission)
Vacuum Dashpot (check valve) green in color
ADJUSTMENTS:
If your transmission fluid is at a proper level the next step is to ensure your vacuum system is in perfect working order along with the throttle linkage being properly adjusted
Once you are sure the fluid, vacuum and linkage are in good working order, the next step is to adjust the VCV valve.
HOW TO ADJUST THE VAVLE:
1. Loosen the VCV valve retaining bolts (no need to remove)
| When bolt has been loosened, screws and hose removed, gently remove cover. |
2. Remove side cover
3. Using a wrench, turn the nut on the end of the spring counter clockwise if your transmission is shifting early and clockwise if shifting late. NOTE: To make this adjustment you MUST hold the throttle linkage in the closed position while turning the nut. It is also important NOT turn the the adjusting nut more than a few millimeters at a time. If you over adjust, your transmission will not shift out of first gear.
Leave the cover off while test-driving the car to make it easier to make adjustments while you are on the road.
If this adjustment still leaves your transmission shifting a bit late or early the next step is to adjust the transmission vacuum modulator which we will cover in a subsequent article.
Subscribe to:
Posts (Atom)