Saturday, July 27, 2019

Easy Mandatory Maintenance on your W123

Keeping your Mercedes W123 diesel in great working order is quite easy, and if you follow the simple directions prescribed by Mercedes it will last you a life time.

The 240D and 300D series with the 4 cyl. and 5 cyl. respectively are nearly identical in their maintenance requirements. This article focuses specifically on the 240D.

Side Note: As I have mentioned several times in the past, there are so many blogs and forums that are littered with pages and pages of guessing on how to repair, check, and maintain these cars. Again, there is no guessing game involved, in fact there is really no need for this or any blog/forum if everyone would refer back to the manufacturers specifications. That said, I know it is helpful for those who are new to the classic car arena and wanting to get started on the right foot, or for those who started on the left foot and now wish to start doing it correctly.

Back to the topic at hand. As the cars age and some or many original components are still chugging along, I recommend that things be checked more frequently than prescribed as a matter of habit to avoid any unnecessary failures or destruction.

The following diagram although very rudimentary for some, is what I recommend at every oil change other than "L" which should be checked at every fill up. 

These items are not in order of importance and not all are items you will be changing at every oil change, rather these are things you should take a good look at for leaks, levels, color, smell and lubrication. Always follow the specific change intervals that Mercedes recommends! Again this is for a W123 diesel.

All change intervals are per Mercedes-Benz. I personally recommend using all Mercedes-Benz fluids and filters other than motor oil. Mercedes does not recommend using synthetics in older cars. I use BlueChem additives where appropriate. Würth grease is an excellent all purpose grease for door hinges, sun roofs, throttle linkage, etc.


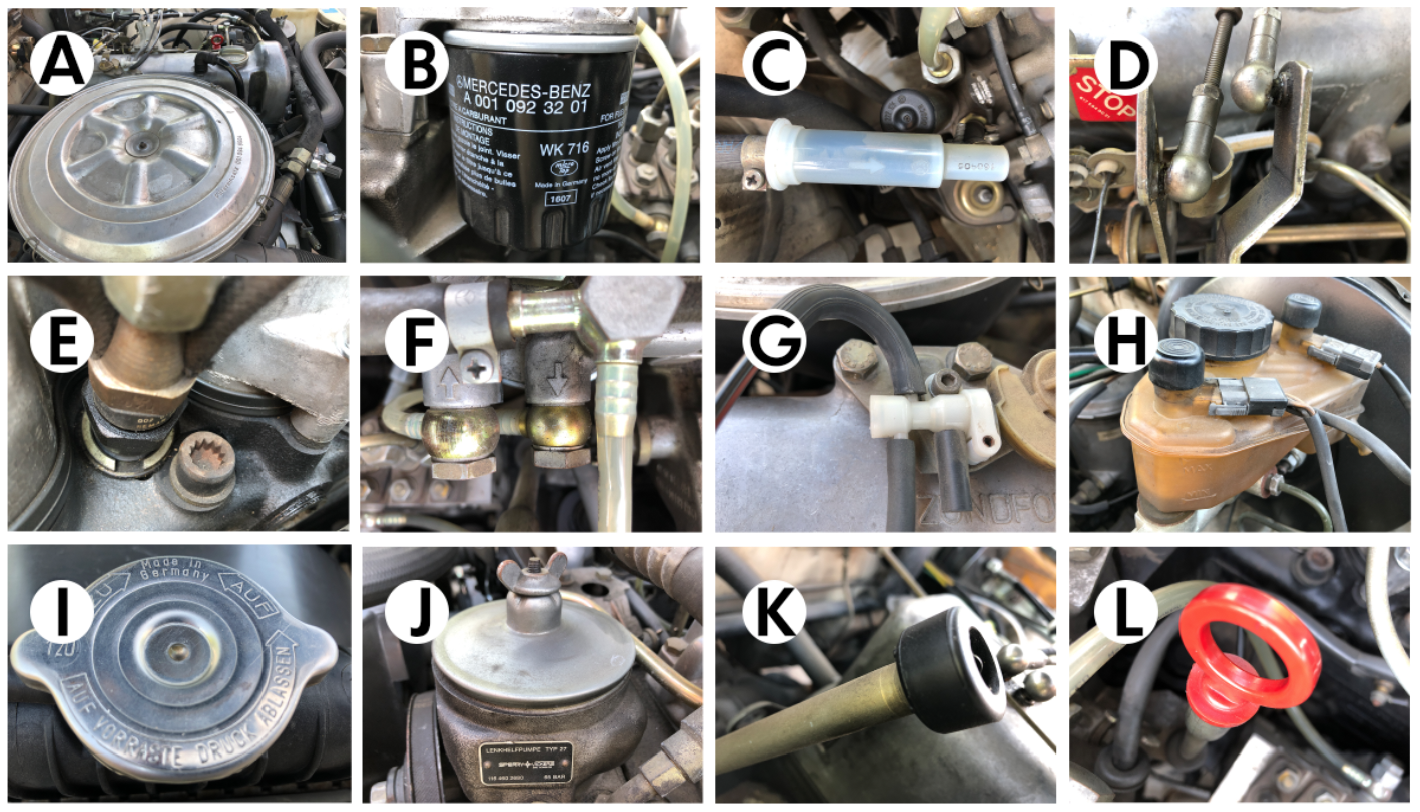
A: Air Filter - Make sure filter is clean and replace at max. 10K miles or 1 year. If you live in a very dry climate the filter may need to be changed more frequently. B: Fuel Filter (secondary) - Make sure there are no leaks and change every 25K miles or 3 years. C: Fuel Filter (primary) - Make sure there are no leaks and change every 25K miles or 3 years, D: Ball Joint throttle linkage - check grease at every oil change and lubricate as needed. E: Fuel Injectors - Check for leaks. I recommend using one can of BlueChem diesel common rail injector cleaner to a full tank of fuel at every oil change. F: Fuel Injection hosing - check all fuel injection hosing and clamps for tightness and leaks. G: Vacuum Connections - check for cracks in rubber connections or brittle plastic colored lines. H: Break Fluid - Check level and change every year, I: Coolant - Change at intervals of 25K miles or no longer than 3 years making sure it is full to mark with a proper mixture for your climate. J: Power Steering Fluid -  Check hoses for leaks, make sure reservoir is to fill mark, check color to make sure it is not turning dark and replace at 50K miles. K: Transmission Fluid - change fluid and filter every 25K miles or 3 years and check when car has been driven at least 15 min., is in neutral (with someone in the car holding the brake) and checking the color to make sure it is not darkening.  L: Oil - check at every fuel fill up and do oil change every 3K miles or 6 months. I personally use Rotella and BlueChem Oil Treatment at each change along with an M-B filter. Not Pictured: Hoses - Check at every oil change for cracks or stiffening - Replace every 50K or 5 years. Belts check for cracking. Differential Fluid - Check at every oil change and replace at 25K miles or 3 years. 

Don't forget the other unseen parts that need attention as well: Fuel Tank Filter, to be checked every 50K miles unless you notice a loss of power or know you have tanked up with bad fuel. Thermostat - Change at 50K miles or 5 years. If you notice your temp gauge is creeping up higher than normal, change the thermostat. 

Perhaps some at this point in the read are rolling your eyes and muttering, "that's ridiculous, I'll know when it needs replacing, it'll leak on the driveway, start smoking, and won't have any power, and that's the time to take care of it!" Well, that certainly is an option, but not if you are serious about saving money, time, frustration and the car. Good thing about the W123 diesel, if you take care of it as directed, it will purr like a kitten and last a couple of generations with no problems.

By checking and maintaining these items at each oil change, you will be hard pressed to experience any roadside difficulties and you will have a car that most will be envious of.


Thursday, July 25, 2019

1975 Mercedes R107 Restoration Complete!

A long time coming, but it's finally finished. On June 15, 2016 a very neglected but 98% rust free 1975 Mercedes-Benz 450SL stood in my way and begged to be purchased. There was no way I could turn it down for the asking price of $500 and the rest is history.

I was told it had been sitting for at least 4 years at its present location and rumor had it that it sat an additional 5 years prior to that, but how bad could it be for $500. If nothing else I could part it out and recoup at least what I put into it. Well, that was 2016 and now it's 2019, and that pathetic SL is back in its glory days.

While the car has been nearly complete for about 6 months now, there are still a few minor pieces that are in the works to get it right. This process has been good for me as it has tried my patience on more than a few occasions, but that's what restoring something does for us!

The day I found it.

After it got home and I began the process of removing the crispy lambswool seat covers and copious amounts of trash.

The end result. The dash, steering wheel and console are original that I restored and recolored.


While the car was a mess, I noted that nothing of importance was missing or destroyed. My goal was to keep and restore as many original parts as possible and that ended up working out in the end. As you can see, the car originally came from the factory with a navy interior, which matched the 904 navy exterior along with a navy convertible top, yikes! For a car like this, that was entirely too much navy, at least for me, and 1970's or not, I still would not have bought into that monotone madness.  

So it was off to the Mercedes-Benz Classic Center in Irvine, California to find out what my color options would have been in 1975, and the news was good. Did I wan't to change the original exterior color? No. The interior was all that needed to set the monotony apart as I liked the MB 904 very dark blue, almost a blue/black. The interior color palette was not extensive but a lot better than what it was. My 1975 interior color options: black, blue, parchment, tobacco, red and bamboo. The winner: tobacco. 

Next was the top and carpet. From what I was told, the top color options that were directly available from the factory were black, blue, wheat and brown and the loop carpeting was available in palomino, cognac, charcoal, bamboo, black, blue, beige, red, brown and gray. The winner: Brown, which is a speckle of lighter and darker brown in the loop. The top was the last item to throw in the mix and it was a tough battle with everyone weighing in on what would look best. Blue was the major consensus and that just didn't seem to create the delineation needed to bring this alluring car to its prime. The winner: Brown

While the car doesn't appear too neglected in the photo the day I found it, it had been painted white, from the original blue, and the job was so bad I think it would be an insult to say Maaco did it. Regardless, the car was stripped to metal and properly painted.

The entirety of the 450SL went through a deep clean including the engine that was home to a family of Packrats among other critters. Thankfully they only chewed some of the vacuum hose, but no wiring thankfully.

The following are snapshots of the restoration through time.


The day I found the car and purchased it. The car was then taken to my home where we got it running and checked out the necessary items to make sure it was worthy of a restoration, and indeed it was. The rims on the car at this point were the knock off chrome Ronal rims that were pealing and badly pitted, and they went to a junkyard. Original 14in. Mercedes wheels were fitted. I found out from Mercedes the car original came with hubcaps.


The car being taken from my home to the restoration shop fitted with proper Mercedes rims and the last of the production 14in Michelin tires.

At the shop getting stripped, Bondo'd and prepped for primer.


Primed, masked and in the paint booth ready for paint.


My paint guy mixing the original Mercedes blue.


Laying down the color. Truly felt like this day would never come!


Prepping the "show clear" coat.


Laying down the clear. This guy is an exceptional painter and so fortunate to have had him do this car.


Done! 

Even though it's done, there are still some things that need fine tuning. More will be posted on those items as they get worked on.