Mercedes AC Smell and Filter Change
If you own a Mercedes-Benz, model year 2008 to 2020 there is a good chance you will or have faced less than desirable smells from your Air Conditioning or HVAC system. You can read more on this case here: Top Class Actions
This article is to deal with this issue yourself and make sure it is done well and right. I decided to write this article based on my less than adequate response I received when investigating how this problem would be handled by Mercedes.
NOTE: I love Mercedes, both old and new and every manufacturer runs into less than desirable complications. I see it this way, if the manufacture deals with the problem ethically we chalk this up to trial and error of engineering, if they don't, that's a whole different story. With this, I would prefer to deal with a relatively simple smell issue on a periodic basis than many other and more frequent issues that plague many other expensive cars.
At the end of this article you may read the conclusion I have reached based on my engaging in the cleaning process.
As an owner of a 2018 Mercedes GLC 300 4Matic-AMG package, I was truly disappointed to smell hints of musty air flow from the vents on one of our rare humid days. Living in the desert southwest, it is rarely humid and so the problem only occurs during the monsoon season. Nonetheless, it is not pleasant or proper and it needed to be addressed.
After considerable research and discussing the issue with my Mercedes-Benz dealership and Mercedes Benz USA customer service, it became apparent there was no "fix" for this issue. The recommended course of action was maintenance as needed when the smell returns. My dealer stated they will gladly have the car in to replace both HVAC filters and spray the filters with Febreze and change as often as needed at no cost. That resolution, while appreciated, I not what I would expect Mercedes-Benz to suggest through their dealers and far from what I personally want. In my opinion, Febreze stinks and is only masking one smell for another.
With that, my research lead me back to Germany where I find most products to be excellent, yes even Mercedes, which is why I own several, and will always hopefully own the brand. The product I discovered was Klima Clean from Nextzett. If you never heard of them their products have been around for 80 years under the name Einzett. Nextzett is the new entity and has kept the original great products from Einzett and is further building on that brand.
Nextzett Klima Clean claims to remove the crud and oder from the evaporator, evaporator casing and drain area by dissolving it and allowing it to drain out the of system through the systems drain tube. When Klima Clean is dispensed from the can, the product expands into a foam that penetrates the evaporator core and surrounding areas of the case. The product liquifies quite quickly and drains from from the casing.
The image below was taken using a camera scope about 3 minutes after dispensing Klima Clean into the Air-conditioning evaporator box of a 2018 Mercedes GLC 300 Coupe.
APPLYING KLIMA CLEAN TO A 2018 MERCEDES GLC 300
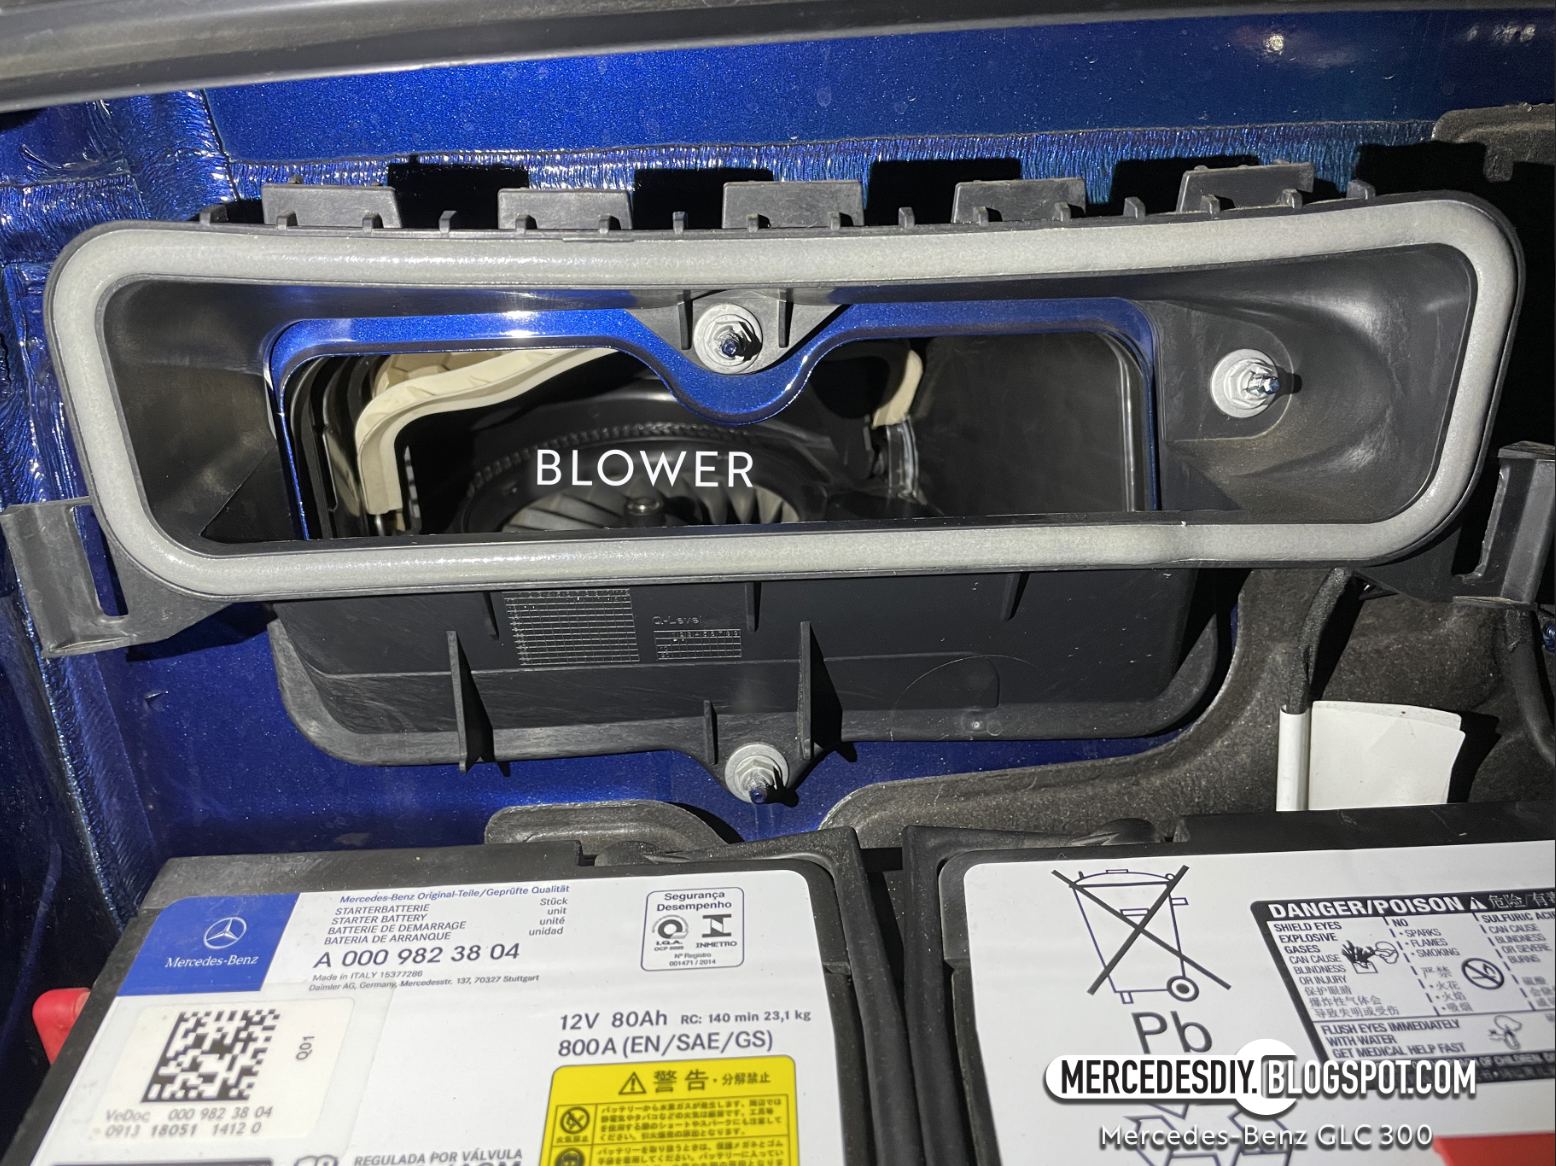
A few thoughts before we get started: Unless you know for a fact you have an all manual climate control system, I would highly recommend following the directions on the can exactly and not dispense the product through the air vents on the dash. In addition, do not dispense Klima Clean through the fan blades of the blower. There is a good chance you may end applying the product to areas that will not drain properly or come in contact with other components in the system ducting that could easily get ruined.
Finally, if you do remove the blower assembly, don't take for granted your access to the evaporator is all clear. Electronic components can be located along the ducting and should not be exposed to liquid.
LET'S GET STARTED
Required Tools
Other helpful tools for the job - Endoscope wireless camera and a new filter(s)
Take all necessary safety precautions when working on your vehicle and with chemicals.
STEP 1
First, check your primary cabin air filter. for LHD vehicles remove the passenger side cover which houses the battery and the primary air filter. To do this, turn the two locks to a horizontal position and gently lift up on the front side of the cover and pull forward. Note how the end of the cover closest to the firewall is inserted in a channel. Be sure to return it exactly as it came out.
STEP 2
Unclip the primary cabin filter housing above the battery. On the left and right side of the filter are retaining clips. Choose a side to start and gently press in to the side of the housing while gently pulling forward. When one side is lose repeat process on the opposite side. The filter housing will now more than likely be hanging from the top clips. Simply tilt slightly back as if opening a hinged lid and unhook. Again, be sure to refit this housing exactly as it came out or both dirt and water may enter the system. Inspect filter and replace if necessary. I recommend using Mercedes filters only.
You will notice while the filter housing is off, you can inspect the air intake area and blower unit. Check for any debris located in the area. If the filter housing has been properly fitted from the last filter change the area around the blower ducting should be very clean.
You will also notice a flap of sorts that has a white gasket. This is the "door" that shuts when the recirculate cabin air button is turned on. DO NOT attempt to move this door manually.
Reverse process to complete job.
STEP 3
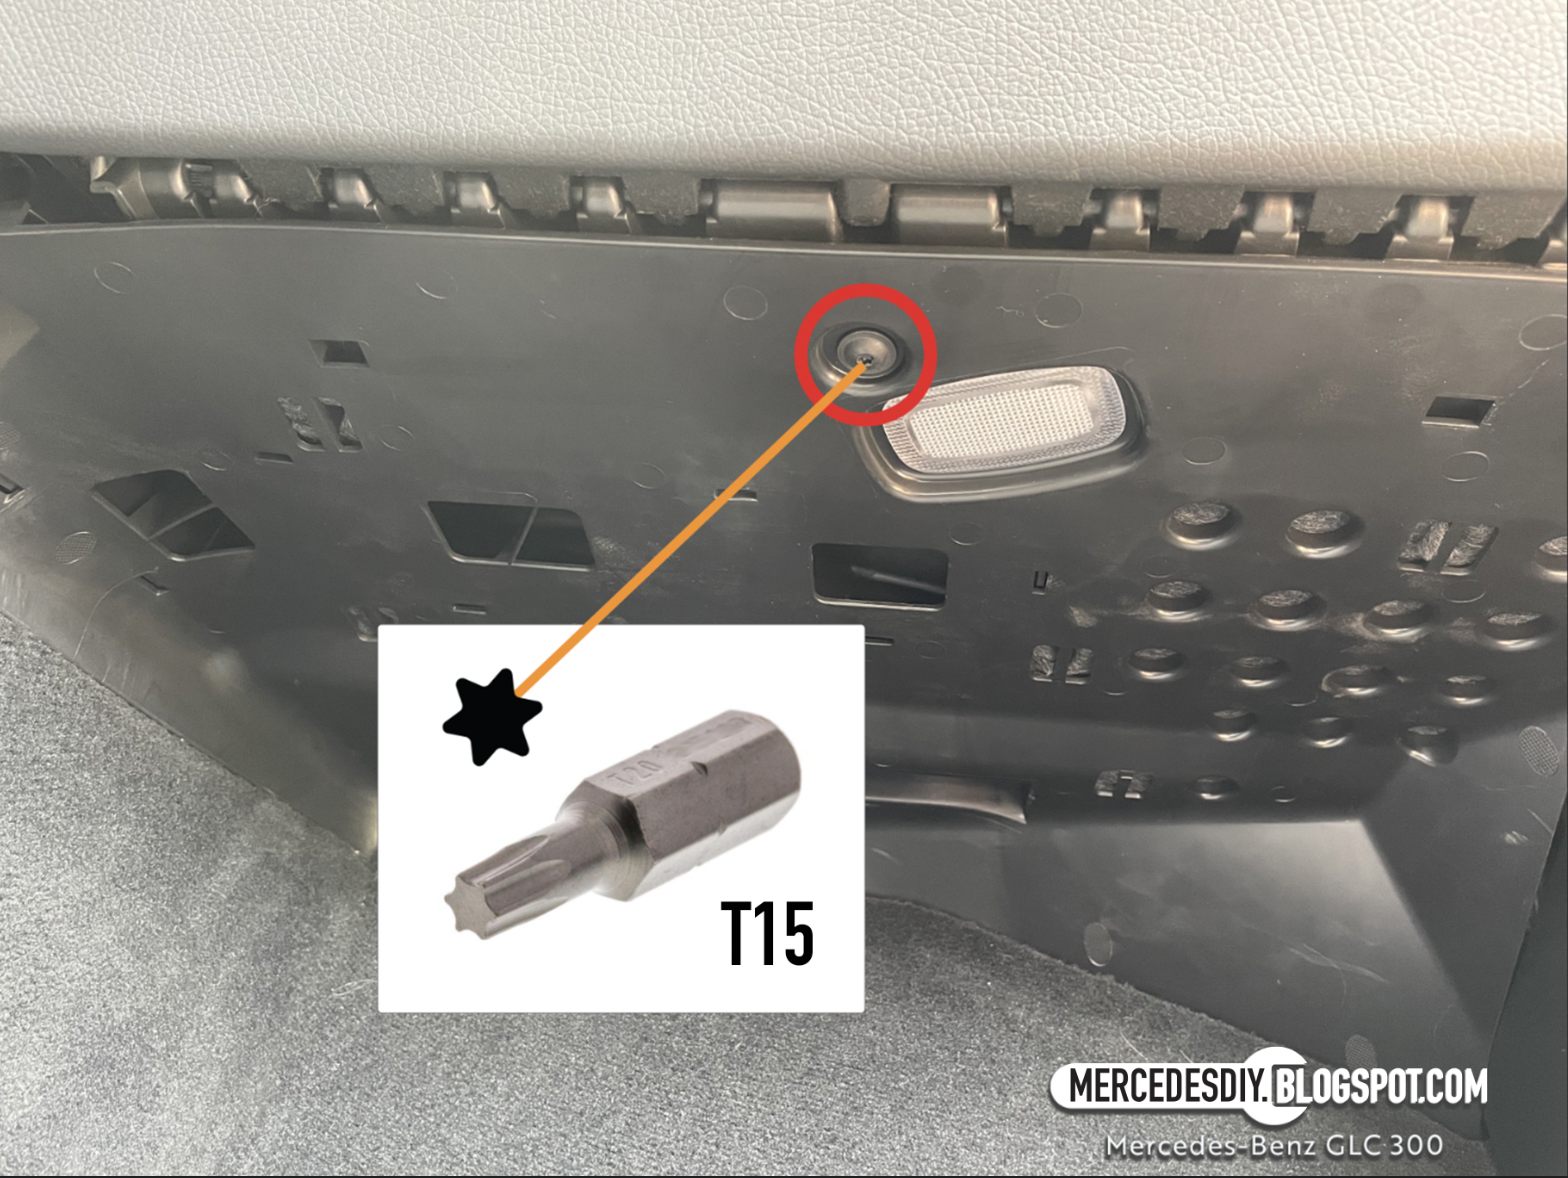
Now check the secondary charcoal activated cabin air filter. This filter is located under the glovebox. The following panel will have to be removed.
To remove the panel you will need a T15 torx socket or screwdriver. Carefully remove the one center screw. Once the screw is removed, gently pull down on the right and left corners to release the metal clips. I recommend doing one side at a time. NEVER USE FORCE, check it before you break it.
Once the panel is lose, it will take a bit of wiggling and coaxing to bring it down and slightly toward the seat. DO NOT attempt to pull it all the way out or you will break several wires that are attached to the back side of the panel. Once the panel is lowered enough, unplug the footwell light and sensor plug located to the inside front of the panel. Remove panel.
STEP 4
Unlock cabin filter door by sliding black plastic slide to the right. At this point the filter door may fall to the floor and the filter may partially fall out. DO NOT yank the filter out as it is a tight fit and will need to be angled and gently wiggled out.
Check the filter for dirt and oder and replace if necessary. Also inspect the green gasket on the filter door for gasket problems.
STEP 5
At this point you are at your access point to apply the Klima Clean. The following images shows what you are aiming for with the extension tube. NOTE: Be sure to use good absorbent rags and a aplastic liner in the footwell area as the product in this vehicle will begin to expand back through the filter opening and drip behind the carpeting and onto the floor.
Insert the extension tube as far as it will go into the HVAC box. Once tube is inserted into the unit, shake can well and connect extension to can. Gently fit the extension tube to can and be sure it is aligned before fully depressing nozzle button. Empty entire contents of can, OR pause as needed to keep expanding foam from coming back toward you and out of the system. KEEP CAN UPRIGHT while dispensing. Holding the can at an angle will likely prevent the can from completely emptying. It is important to dispense the entire can for proper cleaning.
Depending on where your vehicle is parked, you may wish to place rags or a container under the area where the evaporator drains. The Klima Clean will quickly go from a foam to a liquid state and drain on to the floor/ground. Remember, if the car is at an angle, the liquid may drip at a different point than the actual drain tube location.
The camera scope image directly below shows the system 10 minutes into the 20 minute cleaning process and the Klima Clean foam disbursing.
STEP 6
Once the Klima Clean has been fully dispensed, simply install filter door, not the filter itself or the under dash cover. I recommend this as the vapors from the product may penetrate the filter making it more difficult to fully remove the residual smell while venting the system.
NOTE: If your car has a particularly strong musty smell coming from the system. I would repeat with another can after 20 min and once again wait 20 min before following the final steps.
STEP 7
Now follow the directions exactly as the can indicates to allow the Klima Clean to work for a full 20 minutes followed by running the blower with the windows down. When the 20 minutes is up, the entire 10oz of Klima Clean should have drained out of the system at this time (see conclusion for more info on this). I turned the auto climate control setting off, ran the blower on "LO" or (coldest) temp and the fan speed on max for 10 minutes. I also opened the hatch back to help the fumes vent faster and more throughly.
STEP 8
DON'T FORGET, once the cleaning and venting process has been completed, fit the charcoal cabin filter. Returning the old filter or a new one is tricky as it will be entering the slot at an angle and will want to bind on the edge of the opening. Gently pull the front of the filter opening toward you to start the corner of the filter and continue to work it into position. DO NOT shove or bend the filter, it will go in with persistence and some patience.
Installing the filter door is the reverse of removing. Remember the door cover is does not slide into place but is installed going straight up. The left end "U" is inserted from the bottom straight up as well, not pressed in place.
STEP 9
Install under dash cover in reverse process from above and remember to plug in footwell light and sensor if fitted to your vehicle.
CONCLUSION:
WHY DOES THE MERCEDES AC SYSTEM SMELL?
After having performed this cleaning process with another foreign car (non-Mercedes), that has never suffered from a foul smelling Air Conditioning HVAC system, it is quite apparent why the various models from Mercedes are having trouble, they don't drain properly.
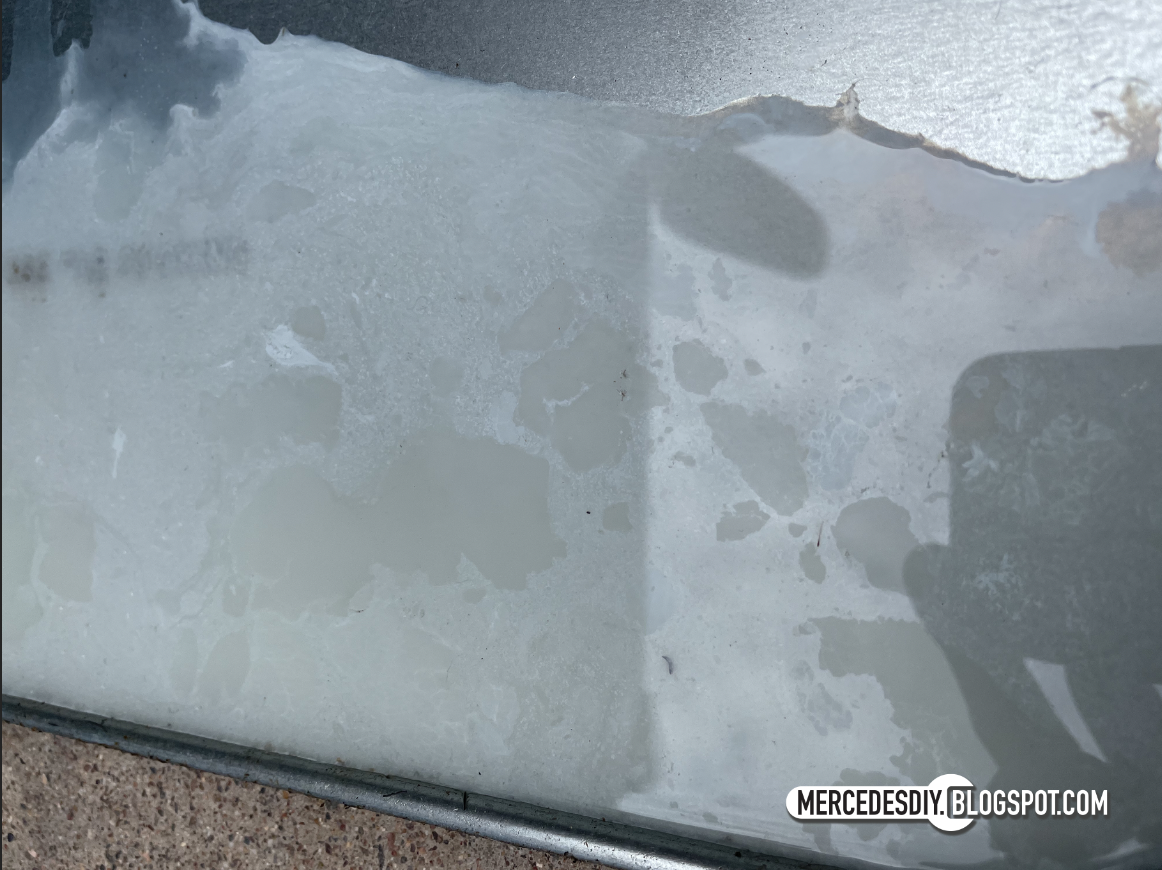
When car "A" was cleaned you can see the liquid was easily flowing out in a steady stream as the Klima Clean liquified during the 20 minutes (second photo below). With the Mercedes GLC, only a very little fluid (about 100ml (1/4 cup) exited the system through the drain tube during that same time. Both cars were in the exact location for the cleaning.
Image directly below shows how little Klima Clean drained from the GLC 300 following the twenty minutes. While difficult to tell from the photo, this spot on the driveway was about 12 inches in length and two inches wide, again about 100ml (1/4 cup). In fact it dripped so slowly it dried as it seeped along the driveway.
The image directly below is of car "A" (not a Mercedes) and highlighted is the free flowing stream of Klima Clean coming from the system drain.
This is certainly a major problem and indicates that car "A"'s system completely emptied while the Mercedes GLC retained approximately 250ml of liquid. Yes, that will begin to stink if the car is allowed to sit for more than a day or two.
Car "A" did have a drip pan underneath as it is 8 years old and I wanted to see if Klima Clean really removed grease, grime etc., which it did. For the GLC I simply allowed it to drain on the drive way, but observed the color/clarity of the fluid draining from the system. No alarming colored liquid exited either car.
 |
Image above shows Klima Clean after draining from HVAC in car "A"
|
However, when the GLC was started and the air conditioning turned on "LO" (coldest) with full fan, you can see the Klima Clean began to flow out of the system in a steady stream. This indicates once again that water is being trapped in the system. The water is however forced out by air pressure once the system fan is turned on due to the fact that spray (not visible on video) was being forced from the drain tube sporadically. With car "A", very little dripped out once the car was running and the air on "LO" and fan on full.
Both cars did drip condensation after about 2 minutes from having the doors open on the vehicles and the humidity at 68%.
Once the water dripped clear on each car, I turned off the system and called it a day. When the system was turned off on each car, car "A" continued to drip at a fairly good rate, while the GLC 300 stopped within a few seconds of light dripping. Both cars smelled fresh, especially the Mercedes GLC. We will see how long this lasts and I will report back.
MY ADVICE
Knowing this, I will be turning my fan on high a few minutes before I arrive at home to hopefully blow out as much residual water as possible. The AC does not need to be on for this and potentially would be better if it were not since the system will continue to draw water from the air.
Just my two cents!