TOOLS NEEDED:
PB Blaster or similar penetrating oil
10mm Hex Bit Socket
Socket Extensions
Universal Joint
10mm socket
13mm socket
17mm socket
Breaker Bar 1/2 in. or larger
Jackstands or ramps
Wheel Chocks
Mechanics Gloves
PARTS NEEDED:
Bosch Remanufactured Startermotor
STEP 1 (Day Before)
Spray Hex socket screws at rear of starter liberally with PB Blaster or similar and allow to soak over night. I sprayed it down three times during the day.
STEP 2
Disconnect Battery. I use a disconnect switch on all my classic cars to avoid having to physically disconnect the battery cable. I personally recommend disconnecting the battery when you do just about any type of work on your car.

STEP 3
Remove air cleaner top, filter and air intake trunk.

STEP 4
Remove the three retaining nuts from air cleaner base.

STEP 5
Remove air cleaner lower assembly

STEP 6
Remove upper bolt from intake manifold supporting bracket

STEP 7
Loosen lower nut of manifold supporting bracket enough to allow bracket to rotate forward. No need to remove nut.
STEP 8
Remove bolt securing automatic transmission dipstick tube and gently move out of the way as needed.
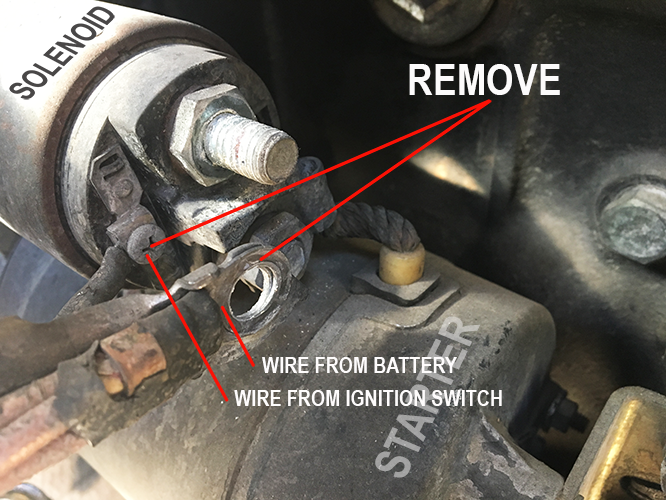
STEP 9
Remove wires from starter motor. BE SURE YOUR BATTERY IS DISCONNECTED! These wires are more than likely brittle and to avoid having to replace them, handle them with car. If you see broken insolation or any bad wiring always fix it immediately.
STEP 10
Remove the two small retaining screws from the front of the starter motor bracket.

STEP 11
Remove the two nuts retaining the front bracket and remove bracket. These two nuts also help secure the engine mount brace. Be sure to secure properly on reinstallation.

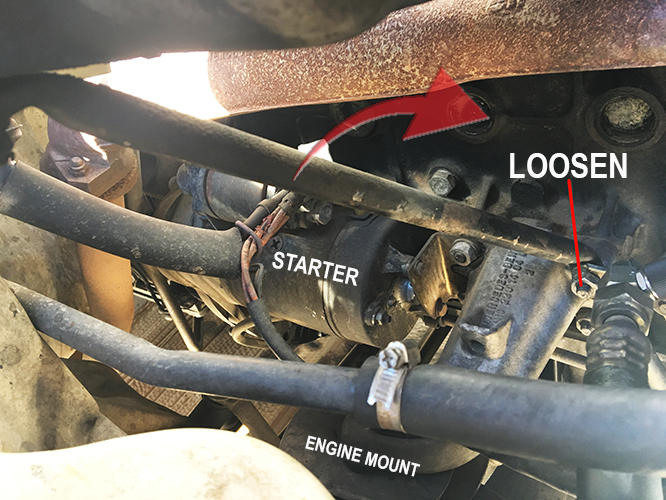
STEP 12
Raise front of car and secure with ether jack stands or ramps. NEVER allow a car to solely rest on a hydraulic floor jack and always chock the wheels not being lifted. I prefer to use wooden "wheel cribs" which are stackable and allow for varying heights. When jacking up a car always use designated jacking points only! For the W123 Mercedes, you may jack the car up at the front center, using the subframe crossmember. Consult your owners manual.
STEP 13
Remove lower hex cap screw with breaker bar and extension(s). This is the awkward part and takes a good bit of force to break original untouched screws loose. NOTE: Make sure all debris has been cleared from the hex cap screw. If the hex bit socket is not allowed to fully seat in the screw head, it will likely strip the head. You do not want this to happen! Photo does not show breaker bar.

STEP 14
Remove upper hex cap screw with breaker bar

STEP 15
Remove starter motor by working it toward the front of the car. NOTE: It is fairly heavy.

Installation is the reverse. Be sure to properly torque all nuts and bolts. Never over or under tighten and always follow manufacturers directions. Also, make sure all eyelet terminals are very clean before reinstalling. Remember, do it by the book. They designed it a particular way, for a very particular reason.
While many will suggest shortcuts, or guess at what might be wrong and how to "fix" a particular item on our classics, there is no reason to engage in any of that. Service manuals are always available and should be used when there is any doubt.
