Saturday, April 15, 2017

Bosch/Mercedes D-Jetronic Harness Rebuild - Phase 1

This article will cover the inspection and first phase in the restoration process of the Mercedes-Benz Bosch D-Jetronic wiring harness. There are several variations on this harness, so it should be noted the one used for this article is from a 1975 Mercedes 450SL. 

If you have not yet removed the harness, see my article on the removal process, dated 3/30/17. The following steps are based on the wiring harness being removed from the car.

STEP 1
This process will take patience, time and scrutiny. Every inch of the harness should be examined for damaged harness covering, wiring and connectors. 

More than likely the harness will be quite tattered and in need of a full strip down, but in the event there are sections in very good shape, they can be saved. I personally like to keep as much original material as I can and the harness is not acceptation. 

The following photos show the harness having just been removed from the car and the over all condition it was in.


STEP 2
Begin removing the old wire coverings one section at a time. It is a good idea to do one section at a time to keep things routed as close to factory as possible. By doing this you will keep everything plugging back in as it originally did with regard to lead length and positioning. I would recommend using a brand new X-Acto knife to very carefully remove the old harness covering that is bad. DO NOT PRESS TOO HARD TO AVOID SLICING THE WIRING BELOW.

STEP 3
Check all plugs for cracking and excessive yellowing of the plastic. In either case, it is highly advised to replace them. There are two options for the two pole connectors. The fist is a prewired two pole plug from BWD part No.27424 (only 2 pole are available) which would need to be soldered in line. Certainly this works, but is not nearly as professional and neat as option two. The other option, and a far better one than the first, is to purchase new spade connectors and corresponding plugs. Both the plugs and the spade connectors are available from Repro-Parts in Germany www.repro-parts.de in both 2,3,4 and 5 pole. This was the option I chose, and the quality is excellent. This company also produces all the terminal boots for Mercedes-Benz and Porsche. The photos below show the process of fitting a new BWD plug and fitting new spade connectors from Repro-Parts.


BWD 2-pole plug ready for soldering to injector leads.
Spade connectors and new plug end from Repro-Parts. This particular plug is for the MPS
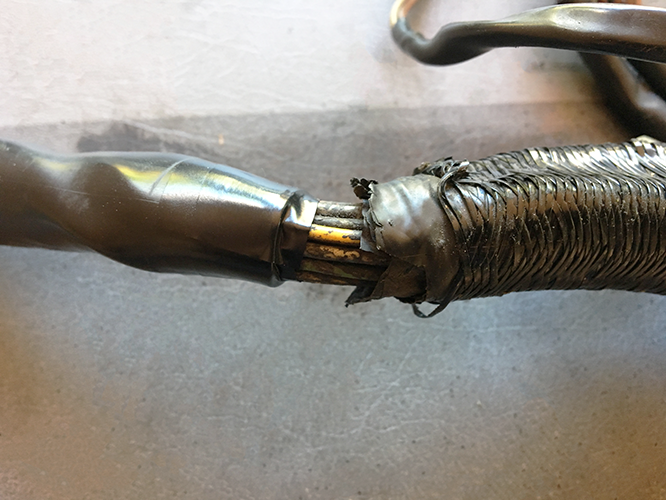


STEP 4
Prep wires for spade connector as shown in photo above. Strip approximately .25 inches from each wire. Mercedes used 18 gauge wire for this particular 1975 harness. Twist each copper wire end to keep from fraying. 

STEP 5
Using a ratcheting crimping tool fitted with an “open barrel” crimping die, insert spade as shown in photo below. This particular die crimps both segments of the spade simultaneously. NOTE: set pressure to lightest setting for this purpose. 

Pro'sKit crimping tool


STEP 6
With spade connector in place, insert prepared wire making sure the insolation and the wire will be crimped in the appropriate places. Repeat as necessary. Photos below show initial steps and final product.


Wire interred in to spade connector and ready for crimping.


Wires after crimping on spade connectors


STEP 7
Using your original plug as a reference, insert spade connectors into new plug. Make sure you insert wires into the correct port. Also make sure each connector clicks in place.

Use old plug as reference


Wires fitted to new plug


STEP 8
Finish by trimming any excess shrink tubing and pull boot over plug.


COMING UP...
In the next article, we will cover checking and repairing the numerous other plug styles that make up the remaining harness.


Thursday, March 30, 2017

Mercedes Bosch D-Jetronic Wiring


The early Mercedes 450SL was fitted with the Bosch D-Jetronic, EFI or Electronic Fuel Injection system. While this blog post will not cover in detail the entirety of the D-Jet system, it will cover all the steps for a full removal in preparation for an inspection and refurbishing of the harness. This will be covered in a future article. 

It is a good idea if you own or are in the market for a Mercedes 450SL or any classic Mercedes, to either regularly inspect or throughly inspect the car respectively. As our cars age, much of the rubber, plastic, and wiring is in poor condition and needs to be either replaced or repaired. Don't risk a fire!

Removing the EFI - D-Jet wiring, is not complicated, does not require any special tools, but will require some physical contortion. As is indicated throughout the car used for this blog is a 1975 450SL. The wiring will vary depending on chassis series.

STEP 1
DISCONNECT BATTERY!

STEP 2
Remove air cleaner and the plug to the air temp sensor. While in the process, check the seal on the underside of the air cleaner housing. This is the seal between the air cleaner and throttle body. This seal is still available from Mercedes-Benz. TIP: When purchasing a new seal, make sure it is for the D-Jet. The later K-Jet will not fit. 

STEP 3
Label every wire and take photos before removing any thing. I use masking tape looped around the wire and stuck to itself with a piece long enough to write on with a Sharpie. 

STEP 4
Unplug the wires from their respective terminals but leave harness in place. Check all terminals for damage as you unplug each wire
Throttle Position Sensor (Shown: 1975 450SL)

Intake minifold sensor—passenger side (Shown: 1975 450SL)
Harness ground wires (Shown: 1975 450SL)


Thermo Time Switch (Shown: 1975 450SL)


Water Temp. Sensor and Auxiliary Fan Sensor (Shown: 1975 450SL) NOTE: Depending on the chassis series, the Aux. Fan Sensor and driver side manifold temp sensor were wired independently from the main harness.


Cold Start Fuel Injector (Shown: 1975 450SL)


Plug to distributor (Shown: 1975 450SL)


Remove bracket and receptacle (lower half of photo above) (Shown: 1975 450SL)


Manifold Pressure Sensor (MPS) under master cylinder (Shown: 1975 450SL)


Unplug all 8 fuel injectors and be sure to label (Shown: 1975 450SL)


STEP 5
Remove the lower passenger side footwell dash panels and locate the ECU under the dash as shown in photo below.

ECU under passenger side dash area (Shown: 1975 450SL)


STEP 6
Remove the lower spring clip by pulling down on it. The hinge of the clip is attached to the firewall. Once the lower clip is removed, gently wiggle the ECU back and forth while pulling down to release the flanged retaining peg from the upper bracket.

When the ECU is free, remove the plastic harness plug guard (not shown) and the wiring harness retention collar (illustrated below) to release the harness wire and unplug the harness. 


Illustration above shows how the ECU is held in place. (Image curtesy of Mercedes-Benz


STEP 7
Unplug both relay connectors and single line plug. Should one of your plug housings break, they are available from Mercedes.


Harness plugs under dash (Shown: 1975 450SL)


STEP 8
Release the rubber grommet from the firewall. It will more than likely not survive the removal and will require renewal. They are are still available through Mercedes for $80. NOTE: It is not necessary but will make the job easier to remove the valve cover.

Harness firewall grommet (Shown: 1975 450SL)

STEP 9
With help, pull the wire through the firewall. It is best to have one person in the car guiding while the other pulls from the engine bay side.

STEP 10
Remove entire wiring harness from engine compartment and your done, at least with the first part.


In my next blog, we will cover the inspection and restoration of the harness.