Thursday, May 18, 2017

Mercedes R107 Rear Brake Rotor Replacement

Another very straightforward job on the Mercedes 107 and W123 models is removing and or replacing the brake rotors. If your rotors have enough surface left they can be turned to refinish, or if need be replaced. For this job I am using Zimmermann rotors for the front and back.

Now is also a good time to check brake pads for wear and also the calipers for any leaks. As our cars approach over 40 years, things will need to be replaced and things will begin to leak and obviously brakes are not something to neglect. 

This article will cover removing the rear rotors and calipers and an inspection along the way.

STEP 1
Jack up car and remove rear wheels.


STEP 2
Prepare to remove the rear calipers. Make sure emergency brake is DISENGAGED. Pry open lock tabs with a screwdriver. These will need to be replaced as they will most likely be significantly weakened and will not stand up to reinstallation. They are still available from Mercedes-Benz.
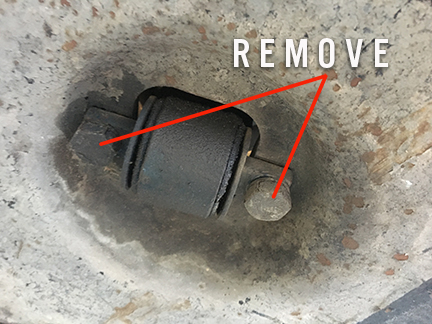


STEP 3
Tap out (remove) the locking pins, and remove spring. If the hardware is in good shape it can easily be cleaned up using a bench top wire wheel. Should it need to be replaced, it is available from Mercedes-Benz and many aftermarket Mercedes parts shops. 


STEP 4
When hardware is removed remove brake pad, depress caliper pistons using channel lock pliers as shown. When pistons are sufficiently depressed, the pad should slide out very easily.
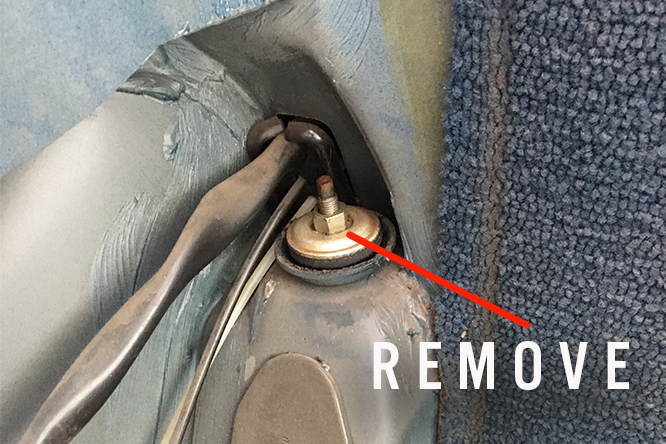


STEP 5
Loosen bolts with a 19mm socket attached to a breaker bar. If car has been exposed to particularly wet or salty conditions a good soaking of penetrating oil the day before would be recommended. Once the two bolts have been removed the caliper will fall off if not held in place. These bolts should not be reused.


STEP 6
Hang caliper so it does not hang from flexible brake line hose. At this stage make sure the hoses are in excellent condition. If there is any cracking or feeling of dryness, REPLACE THEM! Also, check the condition of the pads. If your hoses will need replacing I will be doing an article on brake bleeding shortly.

STEP 7
Check rotors for deep scoring or warping and replace if necessary.

STEP 8
Remove rotors. Begin by lightly tapping all round hub and lightly around rotor surface on front. If that does not release the rotor, tap firmly on back where caliper was located. IF you are replacing the rotors and emergency brake shoes a penetrating oil can be sprayed inside each of the lug bolt holes to help release any rust that may hold the rotor from releasing. REMEMBER any grease will foul the operation of the braking systems.

STEP 9
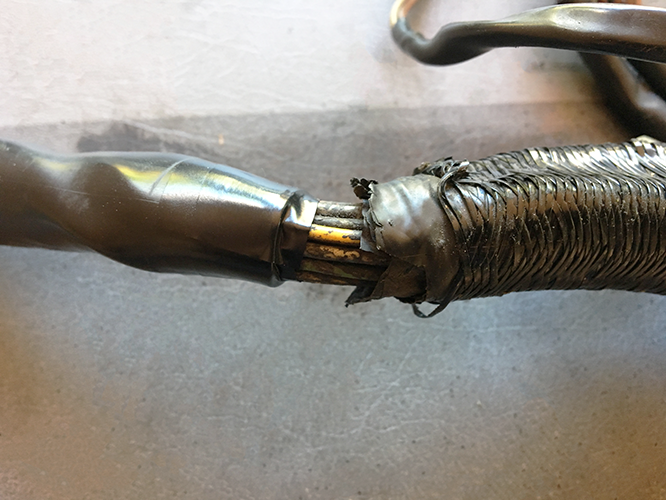
Inspect emergency brake (each side) for wear, corrosion, and be sure it is fully releasing and engaging. If new emergency brakes are needed they are available through Mercedes-Benz. The kit provides all the necessary hardware and shoes for both sides. A future article will cover emergency brake replacement. In my case I am replacing the e-brakes.

Mercedes R107 Emergency Brake. Appears to be original and never touched. Needs to be replaced.


STEP 10
Installation is in reverse order. Be sure that all braking surfaces are 100% free from any oil or greases before installation. Unfortunately my rear calipers were rusting in the piston cylinders and so I needed new ATE calipers, and discs. ATE calipers are available new from aftermarket Mercedes parts stores or from Mercedes-Benz. If you need just the piston they are available from Mercedes-Benz.

NOTE: When reinstalling caliper hardware, be sure to properly lubricate all components with applicable caliper grease.

Complete and ready for bleeding


COMING UP

• Super Easy One Person Brake Bleeding
• Replacing Emergancy Brake
• Rebuilding ATE Brake Caliper
...and much more


Sunday, May 14, 2017

Mercedes R107 Rear Sway Bar Links

If you are getting strange banging noises from the rear of the car when riding on a bumpy road, it is most likely either the shocks or the sway bar links that have failed. Since we covered the shocks in the last post, it is now time to cover the sway bar links.

At least on the earlier R107's such as the 1975 450SL, the sway bar links are very, very easy to replace. 

STEP 1
Jack jack up rear of car and support on jack stands. I personally prefer the flat top jack stands for my European cars.

STEP 2
Remove rear wheels

STEP 3

Unbolt sway bar link from sway bar and back of wheel assembly. Very self explanatory. If your sway bar links have popped apart as mine have, you will only need to remove the lower bolt of the link.


This photo shows the sway bar broken loose from the upper portion of the link. The ball joint is still attached to the sway bar.

Old and new sway bar link. Photo shows how the ball joint separated after many years of service.


STEP 4
Fit new link and you are done! It's almost as easy as 1-2-3.

This is what the final job should look like.

Sunday, May 7, 2017

Mercedes R107 450SL Rear Suspension

R107 Rear Shock Absorber Replacement

If your convertible 107 is clunking around over bumps, it is more than likely bad shocks, and or broken sway bar links. Sway bar link replacement will be covered in an up coming post.

The good side of all this, if broken things have a good side, is that the replacement of these two components is probably one of the easier jobs on the Mercedes-Benz R107. From start to finish this job should not take more than 2 hours for both. There is one caveat, if your car has grown up in a wet or particularly snowy area, it will require the bolts to be well soaked in penetrating oil such as BP Blaster. My recommendation is to do this the day before, and spray it three times several hours apart should the corrosion be heavy. 

Let's get started:

STEP 1
Remove hard top if installed or lower convertible top. If soft top is already down and the hard top is off, open the soft top deck lid cover.

STEP 2
Provided you do not have rear seats, remove the luggage shelf from behind the seats. If fitted with a rear seat, remove those.


STEP 3
Remove hard/soft top locking crank on driver side. First gently pry out trim insert on handle and remove handle.


STEP
Remove the 3 small Phillips screws which retain the side paneling trim on each side


Location 1
Location 2


Location 3


STEP 4
Remove the two 10mm bolts, and two Phillips screws from the chrome trim on each side and remove the trim piece.


STEP 5
Remove paneling. Gently remove by pushing downward to release from upper retention lip.

STEP 6
Remove upper shock retaining bolt, washer and rubber bumper on each side. This will require pliers or vice grips to hold the center rod in place while loosening the nut.


STEP 7
Jack up car. I use wheel cribs with the hydraulic floor jack in place. ALWAYS use extreme caution when jacking a car and aways chock applicable wheels. Always check for rust or damage before jacking up the car.

STEP 8
Remove shock retaining bolts. When bolts are removed, shock will release and fall through to the ground. You can always leave the upper nut in place and remove after the lower bolts have been removed. I find it easier to just catch the shock on the way out.


STEP 9
Install new shocks in revers order and you are ready to go! Always make sure all nuts and bolts are securely tightened an always double check.

COMING UP
Replacing the rear sway bar links. Another very easy job.

Tuesday, April 25, 2017

Mercedes 450SL Muffler Comparison

Not all things are created equal and often times, you get what you pay for and hindsight is generally 20/20, and this is what I discovered about aftermarket mufflers for the Mercedes-Benz 450SL.


After having done considerable research on the Bosal and Ansa 450SL mufflers, I felt reassured that the Bosal would provide the best OEM exhaust note according to the representative I spoke with. It should be noted that in no way am I criticizing either manufacturers quality, durability, materials, craftsmanship etc. The issue at hand is simply based on tailpipe sound or "note", both at idle and under exhilaration. In fact, both manufactures seemed to have very well made products in both fit and finish.

When the Bosal muffler was installed however, I was extremely disappointed at how loud and throaty the car sounded, far from the OEM note I was reassured to get. Interior noise was excessive, and at speeds between 40-55 mph, a very unpleasant drone resonated throughout the cabin.

With this discovery, I contacted Ansa and discussed the current dissatisfaction, and was told I would receive an OEM note from their muffler. In short that was not the case either. Indeed a different note was delivered, but that much closer to an American muscle car on steroids and again generating a very unpleasant tone in the cabin. While I have no problem at all with the exhaust note of a muscle car, I want my Mercedes to sound as it should, and as the manufacture intended.  


Photo shows underside of 1975 450SL with aftermarket muffler

This takes us back to the drawing board with one last option, the $500 OEM muffler from Mercedes-Benz. Yes, in the end it would have been much less expensive to do this from the beginning, but some of us need to learn the hard way. 

All this said, if you are looking to ramp up your exhaust note on your 450SL, either the Bosal or Ansa would be the way to go, and does indeed offer a good price point. If however, original is what you are looking for, the Mercedes OEM muffler is the only option.


Saturday, April 15, 2017

Bosch/Mercedes D-Jetronic Harness Rebuild - Phase 1

This article will cover the inspection and first phase in the restoration process of the Mercedes-Benz Bosch D-Jetronic wiring harness. There are several variations on this harness, so it should be noted the one used for this article is from a 1975 Mercedes 450SL. 

If you have not yet removed the harness, see my article on the removal process, dated 3/30/17. The following steps are based on the wiring harness being removed from the car.

STEP 1
This process will take patience, time and scrutiny. Every inch of the harness should be examined for damaged harness covering, wiring and connectors. 

More than likely the harness will be quite tattered and in need of a full strip down, but in the event there are sections in very good shape, they can be saved. I personally like to keep as much original material as I can and the harness is not acceptation. 

The following photos show the harness having just been removed from the car and the over all condition it was in.


STEP 2
Begin removing the old wire coverings one section at a time. It is a good idea to do one section at a time to keep things routed as close to factory as possible. By doing this you will keep everything plugging back in as it originally did with regard to lead length and positioning. I would recommend using a brand new X-Acto knife to very carefully remove the old harness covering that is bad. DO NOT PRESS TOO HARD TO AVOID SLICING THE WIRING BELOW.

STEP 3
Check all plugs for cracking and excessive yellowing of the plastic. In either case, it is highly advised to replace them. There are two options for the two pole connectors. The fist is a prewired two pole plug from BWD part No.27424 (only 2 pole are available) which would need to be soldered in line. Certainly this works, but is not nearly as professional and neat as option two. The other option, and a far better one than the first, is to purchase new spade connectors and corresponding plugs. Both the plugs and the spade connectors are available from Repro-Parts in Germany www.repro-parts.de in both 2,3,4 and 5 pole. This was the option I chose, and the quality is excellent. This company also produces all the terminal boots for Mercedes-Benz and Porsche. The photos below show the process of fitting a new BWD plug and fitting new spade connectors from Repro-Parts.


BWD 2-pole plug ready for soldering to injector leads.
Spade connectors and new plug end from Repro-Parts. This particular plug is for the MPS


STEP 4
Prep wires for spade connector as shown in photo above. Strip approximately .25 inches from each wire. Mercedes used 18 gauge wire for this particular 1975 harness. Twist each copper wire end to keep from fraying. 

STEP 5
Using a ratcheting crimping tool fitted with an “open barrel” crimping die, insert spade as shown in photo below. This particular die crimps both segments of the spade simultaneously. NOTE: set pressure to lightest setting for this purpose. 

Pro'sKit crimping tool


STEP 6
With spade connector in place, insert prepared wire making sure the insolation and the wire will be crimped in the appropriate places. Repeat as necessary. Photos below show initial steps and final product.


Wire interred in to spade connector and ready for crimping.


Wires after crimping on spade connectors


STEP 7
Using your original plug as a reference, insert spade connectors into new plug. Make sure you insert wires into the correct port. Also make sure each connector clicks in place.

Use old plug as reference


Wires fitted to new plug


STEP 8
Finish by trimming any excess shrink tubing and pull boot over plug.


COMING UP...
In the next article, we will cover checking and repairing the numerous other plug styles that make up the remaining harness.