Wednesday, August 30, 2017

Mercedes 450SL Interior Removed - Restoration

The 1975 450SL is hopefully just a week away from heading into the bodyshop. Only remaining items to be removed are the dashboard and center console. 

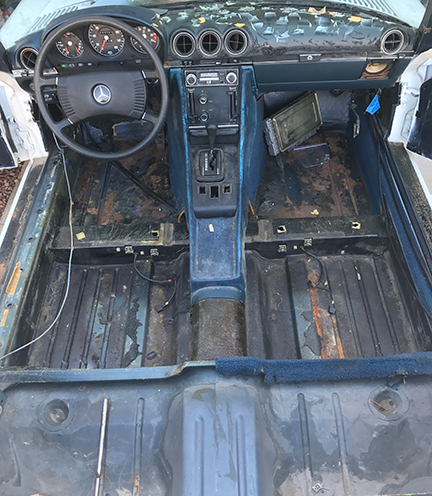
As you can see someone was very desperate to keep the dash cap in place and went crazy with silicone caulk! Sadly the dash was not that bad. I am going to attempt to salvage the dash by removing all the silicone with 3M silicone remove and refinish the dash. 

Trying to salvage the original sound damping mats was unfortunately impossible due to the glue doing its job very well all these years later. It is important however, to pull all of this up to inspect for any damage or rust. Thankfully there is only superficial rust on the floor pans.


Tuesday, August 29, 2017

Easy Removal of Mercedes R107 450SL Seats


I was shocked at how many different stories and methods of removing the driver seat of a Mercedes 107 there are online. So I decided to post on just how simple and straight forward this job really is for both seats!

The passenger seat is very straight forward. Four 13mm bolts and two countersunk Phillips screws. Getting a good photo was harder than taking the seat out so several diagrams will be used for explanation. The following shows the set up of the passenger and driver seating rail systems and function. The following diagrams and images are from a 1975 450SL. Check your model for variations.


To operate the driver seat hight adjustment: If adjustment knob handle is horizontal the seat is in the low position. To raise the seat, pull knob handle straight out and rotate as shown on both rails. This step must also be taken to gain access to the screw that retains the knob in order to remove the seat.


The passenger seat is removed as shown below.


As for the driver seat you will need a large flathead screwdriver bit to do this job correctly. Too often jobs are very difficult because the correct tools are not used.

Do not attempt to do this with a standard screwdriver. You may also benefit from heating the screw slightly with a pencil torch. 

Other than a few changes to the mechanism of the seat, the driver seat comes out just as easily as the passenger. 

I purchased a Pittsburg socket screwdriver set from Harbor Freight with a 1/2 in. driver socket. Largest driver bit however needed modifying as the flat head screwdriver was too thick and did not properly seat. I simply ground the flathead down on a bench grinder until it fit snuggly and will remain in my Mercedes specific tool kit.


The following shows the removal of the driver seat. Again, very straight forward. As you will see in the digram below only two of the three screws are removed. The lower screw is secured at the back by a nut and does not attach to the body of the car.


Once the seat is free to be removed, lift up on the side closest to the door opening, while tilting seat toward center console. When free of door sill, withdraw seat. It is best to do this with the hard top off or convertible top in the down position.

The seat is not exceptionally heavy but awkward, so be careful to have good control when removing to avoid damaging interior or paint work. Unplug seat belt warning light from under seat.

It is recommended that when you have the seat out you throughly clean the rails, guides and re-grease with the proper lubricant. Your seat should slide like new again. You will also find amazing things under the seat as I did from the previous owner!

42 years in the desert will do strange things to products like the three petrified cigarettes
(can you find them) and paper that was turning to powder.


I was however able to subsidize a portion of my lunch with the .62¢ I found.


Tuesday, August 8, 2017

Trim Removal - Part 2

The trim removal continues on the 1975 Mercedes 450SL. While it is not a glamorous job, it is extremely educational to do this exercise personally. I am finding all sorts of things in the door that I am sure go some where but have since rattled lose, broken off etc., over time and now is the time to get all that right. 

So far the following items have been removed:

• Rear taillights x2
• Trunk fueltank division panel
• Rear bumper assembly and bumper trim
• Emblems (450SL and Star)
• Chrome trunk trim
• License plate bumpers / plugs x4
• Trunk gasket
• Trunk locking / latch mechanism
• Soft top lid trim (chrome and MB-Tex)
• Convertible top
• Convertible top cover locking / unlocking mechanism
• Antenna
• Gas flap (door)
• Door molding (guards) and chrome trim at window
• Interior door skins, armrest, pocket
• Side mirror and mirror bracket
• All rubber gaskets on door and body at entry
• Door handles and locking / latch mechanism
• Seat belts
• Door sills (chrome and rubber)

And while this list seems short, I have carefully collected dozens of ziplock bags with parts so far. Labeling everything is key to remember how it all goes back in the end. Losing parts will get expensive if you are able to even find them. It is my recommendation that other then rotting rubber parts you should keep and photo graph everything until you have the new parts in your hand and know it works.

The following photos show the progress in limited detail as of today.

Convertible top and locking mechanism removed

Door latch assembly

Power window hook up. Everything looks very good in here.

Door after paneling removed

Interior paneling being removed

Side mirror bracket

Side mirror bracket removal. Two screws and two bolts must be removed to remove bracket
Mirror bracket removed
Interior of door. You can see three of the exterior molding clips along with the old insulation.

Passenger side door actuator


Latch assembly removed.

Thursday, August 3, 2017

Restoration 107 - Trim Removal - Part 1

With the color scheme decided for the interior and exterior, it is now time to get the 450SL ready for the body shop.

Several weeks ago I finalized the shop that will be doing my work. I also received my final estimate and with it came two options. The first, deliver the car as is, and let the body shop strip the trim, and interior or, option two, do the interior and trim removal personally. 

The latter is what I am choosing to do as it will save $3,000+ thousand dollars. I have also chosen this option so I can personally go through every piece of the car myself and see exactly what needs to be replaced, fixed, restored, etc. as the parts come off. This option will also give me time to redo the many interior parts, such as recovering the seats, restoring the center console, dash and other interior trim pieces that will be taking on the new interior color.

Over the next several weeks, photos of parts being removed will be uploaded of each section. In addition parts that will need replacing, such as all the rubber seals and gaskets, will be included in each article and update complete with part numbers and whether or not they are still available from either Mercedes-Benz or as an aftermarket item. I am hoping not to have to get too many aftermarket parts, as I wish to keep this car as close to 100% factory as possible.


Trim Removal Begins
Complete Taillight Removal


Remove cover/bulb holder
Unplug cover/bulb holder from electrical system
Trim screws, frame and lens screws (bolts) are different as seen by a screw driver slot is fitted for the chrome trim screws the rest do not. You do not however remove the screw to remove the chrome trim, just the retaining nut.
Taillight frame still in place. This needs to be removed for painting. This piece also holds the tail lens gasket.
Frame and taillight lens removed


Entire taillight assembly removed. Chrome trim directly above opening still in place.


Chrome trim removed above taillight opening. Remaining trim to be removed in a separate post

Sunday, July 23, 2017

Restoration R107 - The Color Scheme

As we get closer to the 1975 Mercedes-Benz 450SL heading into the bodyshop the first week of September, several key questions have to be addressed now.

A brief review: I found the car more or less abandoned in the desert southwest of the United States. The car had been sitting in a lot for a minimum of 5-8 years baking in the sun with the windows down. Not sure if having the windows down was a help or a hinderance, but the interior took a pretty good beating from the average 296 days a year of  sun and the four months each year of summer time temperatures in the 110°F/ 43°C to 120°F/48°C. 

Original MBTex interior from 1975

Bad paint and bad masking job.  
All extremes considered, Mercedes can be quite satisfied with the materials they utilized for their cars. While the upholstery is needing to be replaced, it is in absolutely amazing condition as seen in the photos. 

While there is no seat bottom or back coconut fiber cushions left to speak of, the MB-Tex is one remarkable product;  still soft and showing only light deterioration. 

Before we go too much further, it should be noted that the car came from the factory in 1975, navy blue on navy blue. Have to admit, I personally find that combination quite dismal, and a bit of contrast from the interior to exterior would make for a more sophisticated appearance. It should be noted the factory exterior blue was very sloppily painted over in white as currently seen, but it will be returned to its original 904 midnight blue.

With the option now available to consider an interior color change from the original navy, I inquired with several manufacturers on interior kit prices. The shop I decided on was German Auto Tops in California. The prices were unmatched and the owner was very knowledgable, and has been in the business for many years. I inquired as to where he sourced his MB-Tex and carpeting and feel extremely satisfied German Auto Tops will provide me with exactly what I am looking for.

MBTex Colors from 1972-1980
Now for the actual color. Thankfully Mercedes did not offer a million interior colors, making the task a slight bit easier, but not easy enough. From 1972-1980 Mercedes offered the MBTex in Black, Wheat, Blue, Parchment, Bamboo, Avocado, Tobacco, Red, Mahogany and Antique Bamboo. While all of the color choices could work with the midnight blue exterior, yes, even the avocado, it would take a strong stomach to pull that one off.  So, I have pulled the plug on black, blue, avocado, and red. The two bamboo options are hard to run with because I already have a Mercedes with that color interior and don't know that I can handle two in that color. What's left? tobacco, mahogany and parchment. I have been comparing these three colors over the past month to the original 904 paint that remains under the hood at different times of the day to see which color offers the most luxurious visual appeal and the verdict is in — Tobacco wins. 

Now for the carpet which is thankfully a much simpler choice, and it will be Brown loop.

Left to Right: Final color scheme. Carpet, seating and dash, body
One could absolutely change to other color options from other years, but I am a stickler for originality and want to commit to what would have been available in 1975 as if I were purchasing the car new today. 

One other factor has also played into my decision to go with a darker interior and that is wanting to keep the dashboard darker. For many years Mercedes and most manufacturers color keyed the dash to the interior and as a personal preference, a light dash color is not nearly as attractive as a darker color. In 1980 Mercedes converted to using a black dash top across the board, which I feel looks much more sophisticated.  Again, since the black dash was not yet available in 1975, I decided to take care of the "problem" naturally. 


UP NEXT: A trip to the body shop that will be doing the work where I will be getting a detailed accounting of what will take place, and the estimate.


Saturday, July 1, 2017

1975 450SL—R107 Restoration

Deciding to restore a car is never an easy decision, at least for me. So much as to be considered. Will the car hold it's value sufficiently or increase in the years to come? How much real work has to go into it once the car gets started and what level of restoration is appropriate for the model are all things to carefully consider, unless money is no object.

Over the next number of months, I will bring you a fairly extensive restoration that will be taking place on my 1975 Mercedes-Benz 450SL. Unless there are unexpected surprise, the following will be covered in upcoming articles:

• Initial Estimate from body shop and proposal

• Removal of all trim, glass and interior

• Sending the 450SL off to the body shop

• Sourcing and ordering new parts - interior and exterior

• Restoring interior components

• Checking in at the body shop

• Re-installing new interior and exterior trim


This is a rough outline of the articles to come and will be bound to change as the process takes shape.

These next months will include video and photos to help Mercedes enthusiasts wanting to restore their car gain a better understanding of what is involved throughout the entire process. 

The photo shows the car coming home when I rescued it from abandonment. While the car appears to be in great shape in the photo, looks are very deceiving in this particular case. Additional photos will be accompanying future articles on just how miserable it is.

If you have not already done so, please sign up to follow this blog!


Thursday, June 1, 2017

The Right Fluids for your DIESEL Mercedes

The choices are endless when it comes to automotive fluids, and knowing which one to buy can be a daunting task. It can also feel just as daunting to get as many opinions as their are products to choose from.

Hopefully these recommendations will help make your next trip to the auto parts store that much easier. Obviously, this is yet another opinion, but all the products discussed have one thing in common, they are all well tested, and proven products.

These are my personal recommendations, and fluids I have had great success with for many years.

NEW Please sign up to follow this blog


PRODCUT LIST (in order from left to right)

BlueChem 
• Fuel System Cleaner (periodic maintenance)
• Oil System Care (regular maintenance)
• Oil System Cleaner (periodic maintenance)

Red Line Oils
• Water Wetter (periodic maintenance)
• 85 Plus Diesel Addative (regular maintenance)
• Gear Oil (periodic maintenance)

Mercedes-Benz
• MB Coolant (periodic maintenance)

Pentosin
• Super DOT 4 Brake Fluid (periodic maintenance)

Castrol
• Dex/Merc Transmission/Power Steering Fluid (periodic maintenance)

Shell
• Rotella T 15W-40 Motor Oil (regular maintenance) Oil weight will vary by climate. Being in a hot climate I prefer a thicker oil.