Thursday, July 25, 2019

1975 Mercedes R107 Restoration Complete!

A long time coming, but it's finally finished. On June 15, 2016 a very neglected but 98% rust free 1975 Mercedes-Benz 450SL stood in my way and begged to be purchased. There was no way I could turn it down for the asking price of $500 and the rest is history.

I was told it had been sitting for at least 4 years at its present location and rumor had it that it sat an additional 5 years prior to that, but how bad could it be for $500. If nothing else I could part it out and recoup at least what I put into it. Well, that was 2016 and now it's 2019, and that pathetic SL is back in its glory days.

While the car has been nearly complete for about 6 months now, there are still a few minor pieces that are in the works to get it right. This process has been good for me as it has tried my patience on more than a few occasions, but that's what restoring something does for us!

The day I found it.

After it got home and I began the process of removing the crispy lambswool seat covers and copious amounts of trash.

The end result. The dash, steering wheel and console are original that I restored and recolored.


While the car was a mess, I noted that nothing of importance was missing or destroyed. My goal was to keep and restore as many original parts as possible and that ended up working out in the end. As you can see, the car originally came from the factory with a navy interior, which matched the 904 navy exterior along with a navy convertible top, yikes! For a car like this, that was entirely too much navy, at least for me, and 1970's or not, I still would not have bought into that monotone madness.  

So it was off to the Mercedes-Benz Classic Center in Irvine, California to find out what my color options would have been in 1975, and the news was good. Did I wan't to change the original exterior color? No. The interior was all that needed to set the monotony apart as I liked the MB 904 very dark blue, almost a blue/black. The interior color palette was not extensive but a lot better than what it was. My 1975 interior color options: black, blue, parchment, tobacco, red and bamboo. The winner: tobacco. 

Next was the top and carpet. From what I was told, the top color options that were directly available from the factory were black, blue, wheat and brown and the loop carpeting was available in palomino, cognac, charcoal, bamboo, black, blue, beige, red, brown and gray. The winner: Brown, which is a speckle of lighter and darker brown in the loop. The top was the last item to throw in the mix and it was a tough battle with everyone weighing in on what would look best. Blue was the major consensus and that just didn't seem to create the delineation needed to bring this alluring car to its prime. The winner: Brown

While the car doesn't appear too neglected in the photo the day I found it, it had been painted white, from the original blue, and the job was so bad I think it would be an insult to say Maaco did it. Regardless, the car was stripped to metal and properly painted.

The entirety of the 450SL went through a deep clean including the engine that was home to a family of Packrats among other critters. Thankfully they only chewed some of the vacuum hose, but no wiring thankfully.

The following are snapshots of the restoration through time.


The day I found the car and purchased it. The car was then taken to my home where we got it running and checked out the necessary items to make sure it was worthy of a restoration, and indeed it was. The rims on the car at this point were the knock off chrome Ronal rims that were pealing and badly pitted, and they went to a junkyard. Original 14in. Mercedes wheels were fitted. I found out from Mercedes the car original came with hubcaps.


The car being taken from my home to the restoration shop fitted with proper Mercedes rims and the last of the production 14in Michelin tires.

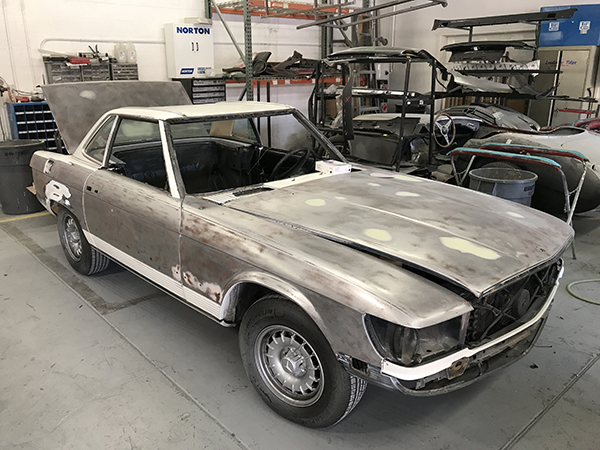
At the shop getting stripped, Bondo'd and prepped for primer.


Primed, masked and in the paint booth ready for paint.


My paint guy mixing the original Mercedes blue.


Laying down the color. Truly felt like this day would never come!


Prepping the "show clear" coat.


Laying down the clear. This guy is an exceptional painter and so fortunate to have had him do this car.


Done! 

Even though it's done, there are still some things that need fine tuning. More will be posted on those items as they get worked on.


Saturday, January 19, 2019

Mercedes R107 Throttle Position Sensor - TPS

The throttle position sensor or TPS is a critical component to the cars overall performance. It must be in perfect working order to deliver proper fuel economy, power and smooth engine operation. 

As with any automotive component, the TPS can wear out or simply become dirty causing the engine to "buck" during exhilaration or cause a rough idle. The rough idle is generally more noticeable when the car is in gear, such as reverse or drive. 

Mercedes/Bosch no longer offer new throttle position sensors for the Bosch D-Jetronic  fuel injection system used in the early to mid 70's. 

If you are in need of a "new" unit, used units are available, but be sure you know they are working and have been checked if going that rout. Several ads on eBay suggested the unit was "working" when it was removed. For me, "working" does not tell me much. Mine is "working" but not as it should. Can I get the car down the road and onto the highway with my unit? Yes, but it's going to be a less than smooth, performance based trip.

In this article I will cover removing, checking, and cleaning the TPS from my 1975 Mercedes-Benz R107 which is not working properly. 

If you are going to engage in this, I would have a known working unit on hand incase yours breaks in the process of opening it up. Also, be forewarned, make sure if you are ordering one whether used or NOS, that you order and receive the correct TPS for your car. Bosch produced two unites for Mercedes, one for Federal cars and the other for California cars.

The throttle position sensor is located on the side of the throttle body and held on by a spring clip. 

STEP 1
Remove the 2 locking screws, then use a flathead screwdriver and gently pry off TPS at the shaft from the back. NOTE: It will make life much easier to remove the throttle body from the engine. Just don't drop the 4 bolts into the engine compartment. You will not get those back.


TPS connected to throttle body with cover removed. 


STEP 2
This is the step that can very easily break the cover so be very careful releasing the cover. Now examine the contacts. The throttle position sensor shown is from my 450SL and as you can see is no longer serviceable. The make-and-break contacts are worn through, causing a very erratic idle and throttle up between 0 mph and 40 mph. 


Hard to see in this photo, but some of the gold is worn through to the backing.

The red circles highlight where the gold is worn through causing the "short" in the circuit.


STEP 3
Based on the outcome of your investigation, the unit will either need to be replaced or cleaned. In this case it is no good.

STEP 4
To clean, take a cotton swab with electronic cleaner and gently wipe over the surface of the contact board. If debris remains, take a white vinyl eraser and GENTLY erase the dirt from the contact area of the board. There can be no marks between the contacts or there will be a potential for short-circuiting.

STEP 5
Calibrating unit.
I will do a subsequent article on how to test and adjust TPS. 


Friday, October 12, 2018

Mercedes W123 and R107 OEM Glass Shortage

Depending where you live, you are likely to need a windshield sooner or later. In the case of several Mercedes-Benz models, that can be a challenge or impossible. 

As of now, there is no OEM W123 windshield glass available from Mercedes. I spoke with the Mercedes-Benz Classic Center in California to acquire a new windshield, and was told it is out of stock and they don't know when it will be made available. They are hoping very soon as they are getting quite a few calls for it. In the meantime, you can get a new windshield from Pilkington Classic for about $220. While I very much respect Pilkington for their glass, it does not supplement the original glass from Mercedes.

When I purchased my 240D in 2015, I needed to get a new windshield and installed Pilkington glass as I was still not certain that I would keep the car long term. Now that I know I am keeping the car, and my three year old windshield is now damaged again from a landscape truck dropping gravel on the highway, I am wishing I could install OEM glass.

With regard to the R107 OEM windshield glass, it is still available at about $500 a copy, but the side door glass is no longer in production and very few new pieces are left.

As it stands, my R107 is at the Mercedes dealer this week being fitted with a genuine Mercedes windshield. Now we can only hope this will last for many years to come, and not succumb to a haphazardly covered load of debris taking flight on the highway.

If you are wanting OEM glass, please contact Mercedes-Benz USA or Europe and express your desire to have the original parts reproduced once again. 


Wednesday, October 3, 2018

Mercedes R107 — Points vs. Electronic Ignition

While I am perhaps overly indebted to authenticity, there comes a point when modification is just worth it. Prime example, points ignition vs. electronic ignition. 

Admittedly, I was very skeptical when I first installed electronic ignition in my 1965 Rolls-Royce Phantom V eight years ago. It has however been the best and only modification I have made to that car. I have now made this modification to the 1975 Mercedes 450SL and again, what a difference.

 The system I chose for the Mercedes 450SL was the Pertronix Ignitor electronic ignition (part 1885) in combination with the Pertronix Flame Thrower 1.5 ohm, 40,000 volt coil. The Flame Thrower coil is a must if you are going to make the modification. No, the coil does not look like the original OEM however, there are options to help that. More on that in an upcoming post. (For what it's worth, the Rolls-Royce received the Pertroinx Ignitor II system, which does not fit the 450SL. 

For the 1975 450SL, modifications will be needed on Pertronix Ignitor for it to fit properly in the distributor. The last I heard from Pertronix, was no plug and play version was going to be produced for this car as there was not enough demand as of yet.

The tachometer will also need to be reconfigured following the installation which is not complicated but once again it is not a simple plug and play as with many other cars that receive the system. More on how this is done in a future article.

Finally, you can decide either to leave the original Mercedes switch gear or eliminate it. I chose to eliminate it and remove the two resistors as recommended by Pertronix. If the resistors are kept inline, the Flame Thrower coil will not perform as designed, hindering the upgraded performance. Do however keep all your original components. Many collectors would like to have those quickly vanishing parts should you sell the car.

To keep the look of the car original, I have left the switch gear and the two Bosch resistors in place. 

Pros of the Pertronix ignition? A much improved idle and engine responsiveness, in addition to a slightly increased fuel economy. One particular note of interest was noticing that both the Rolls-Royce and the Mercedes delivered a different exhaust smell following the installation of the electronic ignition. It was quite evident to the olfactory that the combustion was more complete. 

Cons A little extra wiring will need to be done and a bit of modification to the Ignitor unit itself to seat properly in the distributor. 


Wednesday, August 8, 2018

Early 450SL/SLC Seat Adjustment Knob Removal

Should it be necessary to remove the seat back adjusting knob from an early Mercedes R107 350SL, 450SL/SLC will require a bit more than just a pull or pry. If you are not sure what style adjusting knob is on your car check first, as you will destroy an early version by trying to pry it off.

The following is helpful should you need to replace the plastic chrome trim on the seat hinges or disassemble the seats for restoration.


STEP 1
Insert a small screwdriver into the 4 slots around the knob center insert as shown. Do this gently to avoid cracking the cover.


STEP 2
Using a hammer and screwdriver, gently tap the locking spring clip counter clockwise to the "unlock" position.


STEP 3
Pull off rear portion of knob.


STEP 4
The trim piece can now be removed. This would be the time to give the adjusting hinge mechanism a good cleaning.


Reassembly is the reverse.

Friday, July 20, 2018

W123 Mercedes VDO Tempomat Cruise Control Actuator Replacement

The Mercedes-Benz VDO W123 Tempomat cruise control is now going on 42 years of service for the first years of production. Or perhaps it is no longer in service due to mechanical failure. 

These units, based on the research I have done, are pretty robust and are serving a good long time. That said, my 1981 240D with the bellows style VDO Tempomat actuator has been baking under the hood in the desert for many years and is finally not holding proper vacuum. 
Mercedes W123 VDO Tempomat cruise

NOTE: Before you get a new actuator, they are $640, make sure it is not the amplifier (the brains) under the driver side dash or a vacuum leak elsewhere. The amplifier is subject to intense heat and vibration and they do get fickle with age. Several symptoms of a amplifier going bad is being able to increase your speed using the cruise control lever but not being able to set that speed once you let go. Other scenarios include the cruise control cutting out while engaged. 

I have already replaced my control unit with a remanufactured unit several months back as new units are not available from Mercedes.

Once the cruise control began working, I realized it had probably not been used in many years and the actuator began to malfunction after several trips on the highway. The symptoms: Once the speed was set, it would steadily lose it a few miles per hour every several seconds. Either the Tempomat was losing vacuum due to a dry rotting bellows or the internal vacuum/vent switch was not engaging properly.  Either way, in my case, it was time for a new unit as I knew I did not have any vacuum leaks.

NOTE: It is also important to note that the cruise control actuator is to be hooked up to the 2/3 way yellow and gray vacuum check valve (some check valve used for the door locks) which draws vacuum from the vacuum reservoir tank located in the trunk above the gas tank. Make sure this is not leaking or it will cause problems with your cruise control among other problems.

REPLACING THE VDO TEMPOMAT CRUISE CONTROL ACTUATOR

The replacement of the actuator is not complicated at all, but one that will require a great deal of finesse to remove the bowden cable, if you wish to save the cable. While there are a number of NOS actuators available from Mercedes, there are evidently only two bowden cables remaining in the global Mercedes stock. 

While the cable is not fragile, all the plastic clips that are necessary to keep the cable in place are! If you break any of these clips the cable will not function.

STEP 1
Disconnect the vacuum, and vent lines along with the electrical plug. Now is the time to make sure no vacuum hoses or rubber connectors are failing.


Disconnect the three plugs show in the photo. The gray nut for the vent line is plastic!


STEP 2
Remove the nut holding the actuator in the bracket.


STEP 3
Carefully release the bowden cable from the throttle linkage (valve cover area). Remember, the plastic clips are very brittle and are ready to crumble. Gently using needle nose pliers will work well.

STEP 4
Unscrew the plastic threaded adjusting "nut" and once again using the needle nose pliers release the next section of the bowden cable.


STEP 5
Push the cable toward the actuator to give a bit of slack to remove the next clip. This clip is awkward to remove and is too ready to fall apart. Go slow and gentle.

STEP 6
Unscrew the three screws at the actuator retaining plate for the bowden cable. Give yourself enough slack for room to work. 


STEP 7
Release bowden cable from cover


STEP 8
With the cable removed, the installation process is the reverse. 

STEP 9
The following steps are for the W123 second generation diesel models only! To adjust earlier models, W115 and W123, please refer to the Mercedes Service Manual.

Adjust the cable. If the cable is not properly adjusted according to the Mercedes service manual the cruise control will not function properly. Make the following check and adjust cable length as necessary with the plastic threaded adjusting "nut": Press and hold the emergency stop lever (diesel) in the off position and check the slack of the cable.


Tuesday, July 3, 2018

Mercedes R107 450SL Bumpers – U.S. Market Cars

In the early 1970's the U.S. Department of Transportation required upgraded bumpers to accept a 5 mph "tap" without any significant damage. As many will remember, these bumpers were pretty ugly and extended the length of the car significantly. 

Mounted on twin shocks, with rubber corners, rubber block overriders and rubber impact strips, they have now taken on a certain retro charm. 

Disassembling the bumper for restoration or repair is not complicated and is well worth it if you are wanting to do your car right. 

STEP 1
Both the front and rear bumper are held in place by two shocks mounted to the body of the car and by two mounting brackets on each side of the driver and passenger fenders (front and back). Start by detaching the side brackets. Next, simply remove the shock bolts and remove the bumper. NOTE: The bumpers are fairly heavy and awkward. I would recommend making this a two person job to avoid damaging the car or the bumper. 

STEP 2
Once the bumper(s) have been removed it is time for disassembly. My stainless steel caps were fairly dinged up, but purchasing new ones will cost you a considerable amount. With that knowledge at hand, I decided to have the old caps restored. You can either take the caps to a metal polishing shop who will beat out the dents and polish or, should you have the skill and tools to remove the dents it will save you a good bit of money. I chose the latter as I have metal working experience and once dent free, took the caps to be polished. I would recommend not attempting to polish at home unless you have professional equipment. Getting the mirror finish can not be achieved with consumer grade tools.

STEP 3
Next, remove the turn signal units to avoid any damage to them. Should you need one or two they are still available, as are just the lenses. The OEM unit is ULO and can be obtained from AutohausAZ


STEP 4
Now remove the shocks from the bumper. Remove the 4 bolts and extract shock along with two brackets and 2 rubber buffers.


STEP 5
With the shocks removed, the retaining nut for the overriders will be exposed—remove.


STEP 6
Remove the rubber bumper end caps by removing the 3 nuts and bolts. 


STEP 7
Now remove the rubber impact strip inserts. The front bumper will slide out, while the rear bumper will require the removal of one overrider/shock bracket to remove the impact strip.

STEP 8
At this stage the stainless steel bumper caps are now ready to be removed. Work carefully when removing to avoid bending the metal. Slightly lift up each tab to loosen the cap. Gently pry off cap from the back side (not the front lip). The tabs do not need to be opened up very much to get the cap off. 

Be mindful that you will be working around a rubber gasket and soft rubber sponge strip used to eliminate water and vibration.

With the bumper now disassembled and while the caps are off getting worked on, now is the time to clean and prep the bumpers. 

As you will see, the lower portion of the bumper is factory painted with a "rocker panel" stone guard. SEM makes a very good product for this application - Part No. 39793. Make sure to scrape, sand and clean very well before reapplying a new coating. Spray in even long strokes and do not apply in heavy coats. 

At this stage and once the bumper is dry for a good 24 hours at 75°F, the bumper can be reassembled and installed. Again, I would recommend this as a two person job.