Thursday, September 12, 2019

W123 Mercedes CV Boots and Axles

Cracked CV boots are nothing new, but replacing them can be costly, and the axles might not warrant the time or money if the milage is high enough or the boots have cracked. Reconditioning an axle in uncertain condition will likely not serve you well in the long run and could easily lead you to spend even more money having to install new axles in the end. Instead, consider replacing the axles. Wait! It's not as hard as it sounds!

Mercedes-Benz used two types of axles, homokinetic and annular. According to Mercedes, the W123 could have either axle depending on the year it was built so make sure you check your vin and the axle itself before you make a purchase. Regardless, if you are in need of new CV boots with original high milage axles, this would be the time to move ahead with replacing the entire unit.  If your chassis is already fitted with annular, the job will be that much simpler. 

So what's the difference? What's better? Why convert? Who cares?

The difference between homokinetic and annular is how it functions, and that is a subject we will not cover here, but we will cover how they differ with regard to installation.

The following image shows the Mercedes-Benz OE annular axle along side the aftermarket axle that is a cross between an annular and a homokinetic based on the one piece design. The Mercedes axle as you can see requires a "flange" sitting separate from the axle which will be permanently installed in the differential making for a much simpler repair or replacement in the future.


At this point you have several options for this job. First, you can purchase a rear axle flange (needed for conversion from homokinetic to annular) and annular axle from Mercedes. Second option, purchase an aftermarket or refurbished homokinetic unit. Third option, install an aftermarket unit.

Is one better than another? If you are purchasing MB annular axles (homokinetic is no longer made by Mercedes), you are getting an excellent product, the same quality that has probably lasted 40 plus years. Should you go the direction of aftermarket or rebuilt, you run a good risk of noise, vibration and a much shorter life span.

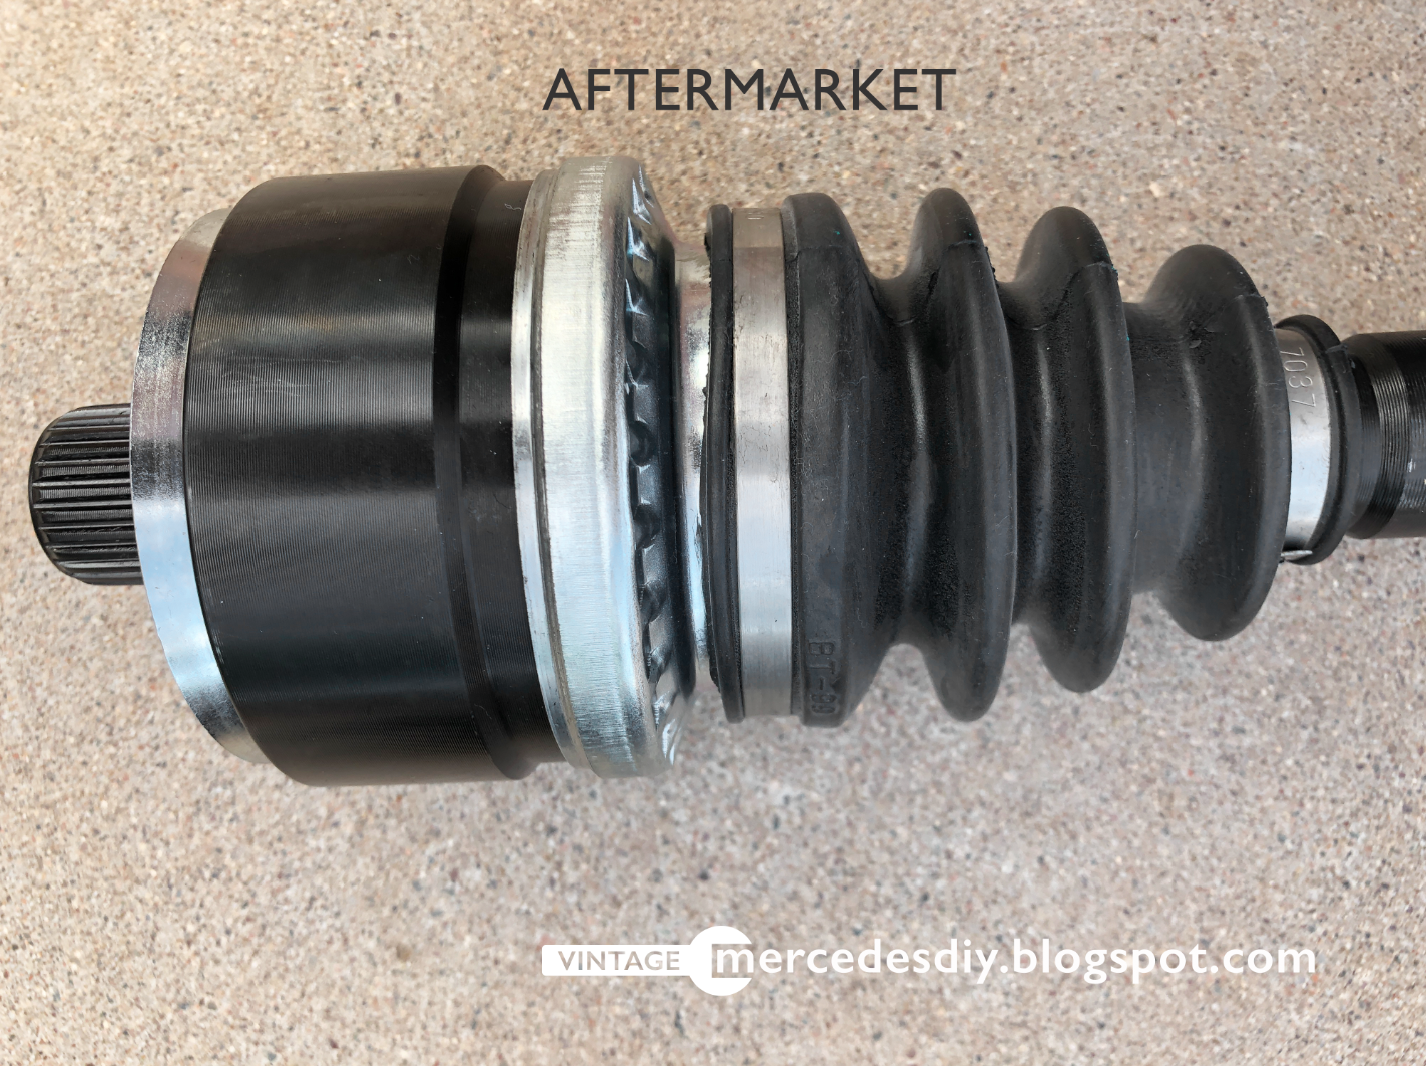
After much research, I purchased what I believed to be the best aftermarket axle on the market, and unfortunately had my slight bubble of hope burst by what I saw, felt and heard. In fairness, it didn't appear all bad, but nothing I would want on my car. Ultimately I wanted to see if a $160 aftermarket axle could by chance prove good enough, and sadly it did not. Most often the old adage holds true, "you get what you pay for".

In brief, the new aftermarket axle right out of the box had a tremendous amount of play in each joint, along with internal components that already clicked and clacked against each other while being pivoted by hand. The original Mercedes axle however, was nearly impossible to move by hand, and no internals could be heard contacting each other what so ever. Several other observations with the aftermarket: the boots were manufactured of substantially thinner rubber, and one of the boots was not installed neatly. In addition the shaft was substantially thicker than the MB unit leading me to believe they have used an inferior steel and need the extra diameter for structural integrity. There were also numerous other areas that lacked the detailing where seals were to seat etc. 

These multiple deficiencies did not build my confidence in the product as a whole and further more I did not want to risk introducing a potentially inferior component into a differential that I know is in immaculate condition. 

On the flip side, no matter which direction you decide to go, installing either axle style is not difficult, but requires more work to change out the homokinetic / aftermarket style should the time come again. As stated previously, the annular is very straight forward after the MB flange is fitted.

Coming Up:  Step-by-Step removal and installation of the rear axles.

Sunday, September 8, 2019

Retro W123 Mercedes Factory Window Sticker, Booklets


It's not often that one gets to purchase a car with most all of the original paper work, manuals, etc. I was grateful to have had the opportunity to acquire my 1981 Mercedes 240D from the original owners of 34 years who not only kept the car in near perfect condition, but included most all the original near perfect documentation from the factory.

Liking automotive history and the stories that go along with cars got me thinking that as younger generations begin to collect cars, many might not have access to some of the original factory pieces. In as much, many old enough to have known these cars from the beginning may have all but forgotten just how it was.

The following I compiled as both a historical perspective, and for some a journey down memory lane. You will see the original books (and page examples in the books) manuals,  inserts and factory invoice (window sticker), and the touch-up paint that came with my 1981 240D. From what I have been told, the only piece that is missing is the service log booklet.


Manufacturer invoice "window sticker"


This would also have been on the window adjacent to the above window sticker


Original envelope mailed June 16, 1981 to owners after purchase from Mercedes-Benz U.S.A. in New Jersey. The following 8 documents were in this envelope.  


Document 1 from envelope

Document 1 example of inside pages

Document 2 from envelope


Document 2 example of inside pages


Document 3 from envelope


Document 4 from envelope


Backside of document 4 above

Document 5 from envelope

Document 5 example of inside pages


Document 6 from envelope

Document 7 from envelope
Document 8 from envelope
Owner's Manual and other glovebox documents that came with car at time of purchase
1981 240D, 300D, 300CD Mercedes-Benz owner's manual

1981 240D, 300D, 300CD Mercedes-Benz owner's manual inside pages
1981 Mercedes U.S.A. diesel fuel guide dealer location booklet
1981 Mercedes U.S.A. diesel fuel guide booklet inside pages

1981 Mercedes North America FM Stereo Radio usage booklet
1981 Mercedes North America FM Stereo Radio usage booklet inside pages
This 1981 Mercedes Consumer Information booklet is applicable to the 240D as well and was required by U.S.A. Federal law on stopping abilities etc. It appears Mercedes was able to use this with all W123 models as the information was applicable throughout the model range
This 1981 Mercedes Consumer Information booklet inside pages
Hang tag on cruise control stalk still complete with original string


Tire information card. This was found under the original spare tire from 1981


This sticker is located on the inside of trunk lid


Touch-up paint


This is a photo of the Norman Scott, Inc. Houston, TX dealership where my W123 was purchased. Image appears to be from the 70's. From this photo the dealer did not sell Mercedes-Benz at the time, and evidently did not sell Mercedes for very long. Research shows that Norman Scott, Inc. primarily sold Porsche and Audi for most of its existence along with several other dealerships that sold other marques. 


Saturday, July 27, 2019

Easy Mandatory Maintenance on your W123

Keeping your Mercedes W123 diesel in great working order is quite easy, and if you follow the simple directions prescribed by Mercedes it will last you a life time.

The 240D and 300D series with the 4 cyl. and 5 cyl. respectively are nearly identical in their maintenance requirements. This article focuses specifically on the 240D.

Side Note: As I have mentioned several times in the past, there are so many blogs and forums that are littered with pages and pages of guessing on how to repair, check, and maintain these cars. Again, there is no guessing game involved, in fact there is really no need for this or any blog/forum if everyone would refer back to the manufacturers specifications. That said, I know it is helpful for those who are new to the classic car arena and wanting to get started on the right foot, or for those who started on the left foot and now wish to start doing it correctly.

Back to the topic at hand. As the cars age and some or many original components are still chugging along, I recommend that things be checked more frequently than prescribed as a matter of habit to avoid any unnecessary failures or destruction.

The following diagram although very rudimentary for some, is what I recommend at every oil change other than "L" which should be checked at every fill up. 

These items are not in order of importance and not all are items you will be changing at every oil change, rather these are things you should take a good look at for leaks, levels, color, smell and lubrication. Always follow the specific change intervals that Mercedes recommends! Again this is for a W123 diesel.

All change intervals are per Mercedes-Benz. I personally recommend using all Mercedes-Benz fluids and filters other than motor oil. Mercedes does not recommend using synthetics in older cars. I use BlueChem additives where appropriate. Würth grease is an excellent all purpose grease for door hinges, sun roofs, throttle linkage, etc.


A: Air Filter - Make sure filter is clean and replace at max. 10K miles or 1 year. If you live in a very dry climate the filter may need to be changed more frequently. B: Fuel Filter (secondary) - Make sure there are no leaks and change every 25K miles or 3 years. C: Fuel Filter (primary) - Make sure there are no leaks and change every 25K miles or 3 years, D: Ball Joint throttle linkage - check grease at every oil change and lubricate as needed. E: Fuel Injectors - Check for leaks. I recommend using one can of BlueChem diesel common rail injector cleaner to a full tank of fuel at every oil change. F: Fuel Injection hosing - check all fuel injection hosing and clamps for tightness and leaks. G: Vacuum Connections - check for cracks in rubber connections or brittle plastic colored lines. H: Break Fluid - Check level and change every year, I: Coolant - Change at intervals of 25K miles or no longer than 3 years making sure it is full to mark with a proper mixture for your climate. J: Power Steering Fluid -  Check hoses for leaks, make sure reservoir is to fill mark, check color to make sure it is not turning dark and replace at 50K miles. K: Transmission Fluid - change fluid and filter every 25K miles or 3 years and check when car has been driven at least 15 min., is in neutral (with someone in the car holding the brake) and checking the color to make sure it is not darkening.  L: Oil - check at every fuel fill up and do oil change every 3K miles or 6 months. I personally use Rotella and BlueChem Oil Treatment at each change along with an M-B filter. Not Pictured: Hoses - Check at every oil change for cracks or stiffening - Replace every 50K or 5 years. Belts check for cracking. Differential Fluid - Check at every oil change and replace at 25K miles or 3 years. 

Don't forget the other unseen parts that need attention as well: Fuel Tank Filter, to be checked every 50K miles unless you notice a loss of power or know you have tanked up with bad fuel. Thermostat - Change at 50K miles or 5 years. If you notice your temp gauge is creeping up higher than normal, change the thermostat. 

Perhaps some at this point in the read are rolling your eyes and muttering, "that's ridiculous, I'll know when it needs replacing, it'll leak on the driveway, start smoking, and won't have any power, and that's the time to take care of it!" Well, that certainly is an option, but not if you are serious about saving money, time, frustration and the car. Good thing about the W123 diesel, if you take care of it as directed, it will purr like a kitten and last a couple of generations with no problems.

By checking and maintaining these items at each oil change, you will be hard pressed to experience any roadside difficulties and you will have a car that most will be envious of.


Thursday, July 25, 2019

1975 Mercedes R107 Restoration Complete!

A long time coming, but it's finally finished. On June 15, 2016 a very neglected but 98% rust free 1975 Mercedes-Benz 450SL stood in my way and begged to be purchased. There was no way I could turn it down for the asking price of $500 and the rest is history.

I was told it had been sitting for at least 4 years at its present location and rumor had it that it sat an additional 5 years prior to that, but how bad could it be for $500. If nothing else I could part it out and recoup at least what I put into it. Well, that was 2016 and now it's 2019, and that pathetic SL is back in its glory days.

While the car has been nearly complete for about 6 months now, there are still a few minor pieces that are in the works to get it right. This process has been good for me as it has tried my patience on more than a few occasions, but that's what restoring something does for us!

The day I found it.

After it got home and I began the process of removing the crispy lambswool seat covers and copious amounts of trash.

The end result. The dash, steering wheel and console are original that I restored and recolored.


While the car was a mess, I noted that nothing of importance was missing or destroyed. My goal was to keep and restore as many original parts as possible and that ended up working out in the end. As you can see, the car originally came from the factory with a navy interior, which matched the 904 navy exterior along with a navy convertible top, yikes! For a car like this, that was entirely too much navy, at least for me, and 1970's or not, I still would not have bought into that monotone madness.  

So it was off to the Mercedes-Benz Classic Center in Irvine, California to find out what my color options would have been in 1975, and the news was good. Did I wan't to change the original exterior color? No. The interior was all that needed to set the monotony apart as I liked the MB 904 very dark blue, almost a blue/black. The interior color palette was not extensive but a lot better than what it was. My 1975 interior color options: black, blue, parchment, tobacco, red and bamboo. The winner: tobacco. 

Next was the top and carpet. From what I was told, the top color options that were directly available from the factory were black, blue, wheat and brown and the loop carpeting was available in palomino, cognac, charcoal, bamboo, black, blue, beige, red, brown and gray. The winner: Brown, which is a speckle of lighter and darker brown in the loop. The top was the last item to throw in the mix and it was a tough battle with everyone weighing in on what would look best. Blue was the major consensus and that just didn't seem to create the delineation needed to bring this alluring car to its prime. The winner: Brown

While the car doesn't appear too neglected in the photo the day I found it, it had been painted white, from the original blue, and the job was so bad I think it would be an insult to say Maaco did it. Regardless, the car was stripped to metal and properly painted.

The entirety of the 450SL went through a deep clean including the engine that was home to a family of Packrats among other critters. Thankfully they only chewed some of the vacuum hose, but no wiring thankfully.

The following are snapshots of the restoration through time.


The day I found the car and purchased it. The car was then taken to my home where we got it running and checked out the necessary items to make sure it was worthy of a restoration, and indeed it was. The rims on the car at this point were the knock off chrome Ronal rims that were pealing and badly pitted, and they went to a junkyard. Original 14in. Mercedes wheels were fitted. I found out from Mercedes the car original came with hubcaps.


The car being taken from my home to the restoration shop fitted with proper Mercedes rims and the last of the production 14in Michelin tires.

At the shop getting stripped, Bondo'd and prepped for primer.


Primed, masked and in the paint booth ready for paint.


My paint guy mixing the original Mercedes blue.


Laying down the color. Truly felt like this day would never come!


Prepping the "show clear" coat.


Laying down the clear. This guy is an exceptional painter and so fortunate to have had him do this car.


Done! 

Even though it's done, there are still some things that need fine tuning. More will be posted on those items as they get worked on.


Saturday, January 19, 2019

Mercedes R107 Throttle Position Sensor - TPS

The throttle position sensor or TPS is a critical component to the cars overall performance. It must be in perfect working order to deliver proper fuel economy, power and smooth engine operation. 

As with any automotive component, the TPS can wear out or simply become dirty causing the engine to "buck" during exhilaration or cause a rough idle. The rough idle is generally more noticeable when the car is in gear, such as reverse or drive. 

Mercedes/Bosch no longer offer new throttle position sensors for the Bosch D-Jetronic  fuel injection system used in the early to mid 70's. 

If you are in need of a "new" unit, used units are available, but be sure you know they are working and have been checked if going that rout. Several ads on eBay suggested the unit was "working" when it was removed. For me, "working" does not tell me much. Mine is "working" but not as it should. Can I get the car down the road and onto the highway with my unit? Yes, but it's going to be a less than smooth, performance based trip.

In this article I will cover removing, checking, and cleaning the TPS from my 1975 Mercedes-Benz R107 which is not working properly. 

If you are going to engage in this, I would have a known working unit on hand incase yours breaks in the process of opening it up. Also, be forewarned, make sure if you are ordering one whether used or NOS, that you order and receive the correct TPS for your car. Bosch produced two unites for Mercedes, one for Federal cars and the other for California cars.

The throttle position sensor is located on the side of the throttle body and held on by a spring clip. 

STEP 1
Remove the 2 locking screws, then use a flathead screwdriver and gently pry off TPS at the shaft from the back. NOTE: It will make life much easier to remove the throttle body from the engine. Just don't drop the 4 bolts into the engine compartment. You will not get those back.


TPS connected to throttle body with cover removed. 


STEP 2
This is the step that can very easily break the cover so be very careful releasing the cover. Now examine the contacts. The throttle position sensor shown is from my 450SL and as you can see is no longer serviceable. The make-and-break contacts are worn through, causing a very erratic idle and throttle up between 0 mph and 40 mph. 


Hard to see in this photo, but some of the gold is worn through to the backing.

The red circles highlight where the gold is worn through causing the "short" in the circuit.


STEP 3
Based on the outcome of your investigation, the unit will either need to be replaced or cleaned. In this case it is no good.

STEP 4
To clean, take a cotton swab with electronic cleaner and gently wipe over the surface of the contact board. If debris remains, take a white vinyl eraser and GENTLY erase the dirt from the contact area of the board. There can be no marks between the contacts or there will be a potential for short-circuiting.

STEP 5
Calibrating unit.
I will do a subsequent article on how to test and adjust TPS.